Whipped Shortbread and Sucre à la Crème for French Fridays

Shortbread

For the third year in a row, the French Fridays with Dorie crew has exchanged Christmas cards. In the first two years, a few of us have included recipes along with the cards and this year, we’ve made it into a full-fledged virtual recipe exchange. I’ve been receiving cards and recipes from Doristas from around North America and around the world and it’s been nice to come home to a mailbox stuffed full of good wishes over the last week or two. Thanks to Alice, Christy, and Candy for making this such a special event.

We were asked to share one (or more) of the recipes we were sent, or to share the one we included with our card. Because I sent my cards out a bit late, I chose the latter option.

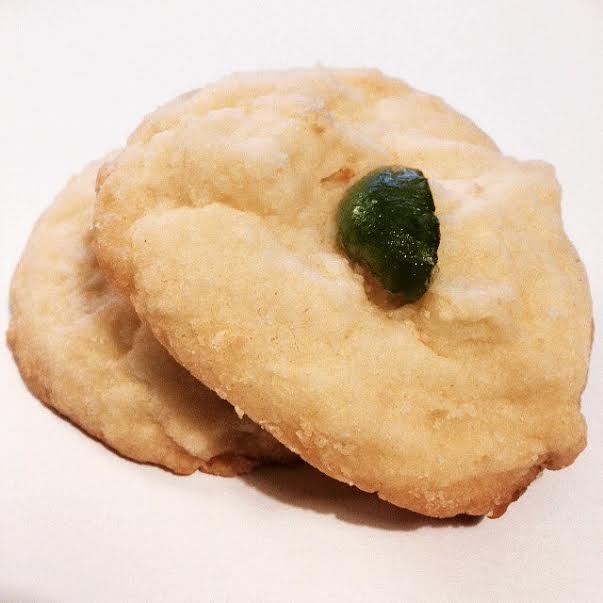
Most of my mother’s family recipes, handed down to her by her mother in a black, coil-bound notebook, have been in storage since my parents moved. So, for the last two years, we’ve been baking other people’s family recipes at Christmastime. Some of the best have come from my mother’s friend Gina, an incredibly creative person. She gardens prolifically, propagating dahlias and fig trees (both of which are now in my yard, thanks to her), and enough produce to feed her extended family and many of the members of her branch of the Catholic Women’s League, too. She bakes, cooks, volunteers, and does any number of other things well. My mother finally got Gina’s shortbread recipe this year, so I’m passing it on to you.

Whipped Shortbread

Bea Hartel/Gina Alary

1 lb butter
½ cup cornstarch
1 cup icing (confectioner’s) sugar
3 cups flour

Beat all ingredients together until consistency of whipped cream.
Drop on greased cookie sheet. (with teaspoon) Press down gently, make edges round if too jagged. Red or green cherries on top.
Bake at 350 for 15 minutes.
Makes 5 – 6 dozen.
Enjoy!

Now, when my mother got the recipe, it was much simpler than this. These ladies come from a generation in which they expect you’ll already know how to go about making cookies. My Mom added some instructions, which you can see above.

I want to elucidate just a little bit more. I whip the butter in my stand mixer first, until it’s light and fluffy. Then, I sift the rest of the ingredients into the bowl of the mixer and run the mixer on low for a bit, just so the dry ingredients don’t go flying everywhere, before bringing it up to medium-high until the dough reaches the consistency of whipped cream. If you’re using the cherries, it’s best to halve or quarter them first. If you prefer not to use glacé cherries, decorate them with something with a little more heft than sprinkles or sanding sugar and keep it simple.

There is also an alternative to the drop method of forming the cookie. You can dust your hands with cornstarch, quickly and gently roll teaspoonfuls of the dough into balls, and press them down with a floured fork (just as you would an old fashioned peanut butter cookie). Then, instead of glacé cherries, you can decorate them with dragées, sprinkles, sanding sugar, edible glitter, or sugar stars. They won’t be quite as melt-in-the-mouth, but they’re still delicious.

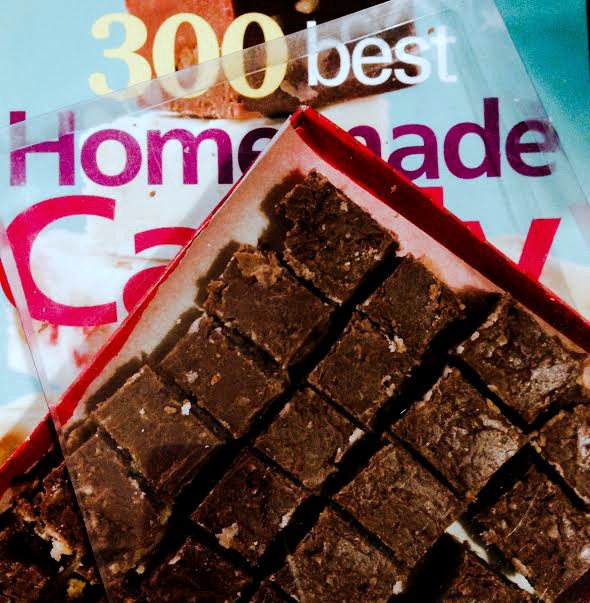
And, since I wasn’t able to make any of the Dorista recipes I received for this post, I’m going to update a family recipe that I shared in 2011. Sucre à la crème is a French Canadian favourite that my mother’s family has been making for generations. There are as many versions as family members, it seems, and I’ve finally come up with my own favourite formulation. My mother’s family is Franco-Manitoban, so they use brown sugar in place of the maple sugar that’s more common in Québécois versions. Feel free to experiment with maple sugar if it’s easy to come by for you. You can see the versions I shared in my original post here.

Now, this isn’t the sort of fudge we usually think of in North America, in which you avoid the formation of sugar crystals so that it’s silky smooth. This fudge is more like Scottish tablet, in which the sugar crystals are part of the pleasure. So, you don’t have to worry about sugar crystals forming on the pan and stirring is encouraged.

sucre a la creme

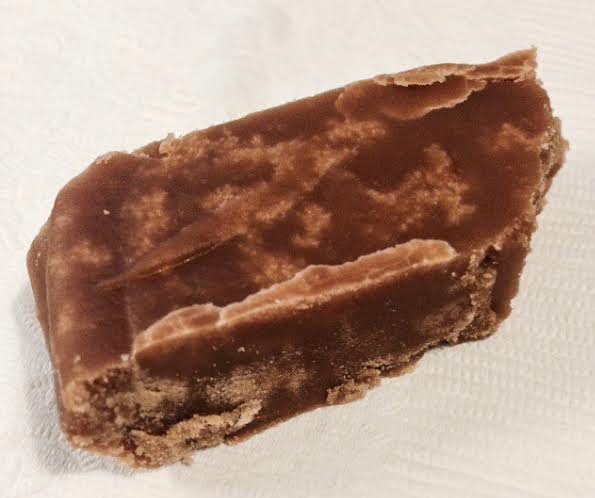
Teresa’s Sucre à la Crème

3 1/2 cups light brown sugar
1/2 cup white sugar
2 cups whipping cream
1 1/2 tsps vanilla

Butter an 11 X 7-inch pan, metal or heat-proof glass work equally well.

Combine the sugars and whipping cream, whisk together until well-blended and cook over medium-low heat, stirring often, until the mixture starts to thicken, sugars the spoon (a metal one is best), and forms a ball when dropped into a dish of cold water. The lower end of the soft ball stage (234-236°F) is just right. Remove the pan from the heat and stir vigourously, adding the vanilla when the candy is just beginning to stiffen. When the scrapings are becoming solid, it’s time to pour the candy into the prepared pan. Chill in the fridge for several hours or overnight, then cut into small squares. It keeps for a week in the fridge or several months in the freezer. Bring to room temperature before serving.

I made some sucre à la crème yesterday, after sharing a Boxing Day meal with my parents. I left most of it there for my Mom to share out with the family and took a small box home to share with a Québécoise friend who hasn’t had the genuine article in some time. There was also a bit for Kevin and me, but that seems to have disappeared. The shortbread is long gone, too, shared at all my parents’ holiday gatherings and even at a cookie swap.

If you try either of these recipes, I’d love to see your results – find me on Facebook, Twitter, or Instagram and share a photo.

I’d like to wish everyone the happiest of holidays and a wonderful 2015. I also want to thank my fellow Doristas for making my weekends brighter with our weekly virtual get-togethers. I’m looking forward to the final few months of Around My French Table with all of you.

You can find the rest of the Dorista recipe exchange fun here: Holiday Card/Recipe Exchange or Makeup.

Advertisement

Holiday Book Reviews – 300 Best Homemade Candy Recipes

Fudge

I don’t know about you, but this is the week when my Christmas shopping always begins in earnest. So, for the second year in a row, I’m bringing you three book reviews to help you cross a few names off your list.

I received a review copy of 300 Best Homemade Candy Recipes from Robert Rose Inc. Nevertheless, all opinions in the following post are my own.

My mother’s aunts were tiny women with very strong arms. That’s because they were raised in an era without stand mixers or food processors to help them in the kitchen. One of the things they used their strength to make, in quantities great enough for the whole extended family, was the French Canadian specialty sucre à la crème. This simple fudge was something we looked forward to at Christmastime and my great-aunt Leona taught me how to make it when I was a teenager. Until very recently, sucre à la crème and truffles were the only candy recipes in my repertoire.

Enter Jane Sharrock’s 300 Best Homemade Candy Recipes. I’ve been curious about candy making for some time now, so when I got the opportunity to review this book, I jumped at it. Sharrock’s cookbook covers most of the categories of candy you can find in a kitchen and some, like lollipops, that I never dreamed you could make at home.

Sharrock began collecting candy recipes when her mother gave her a treasured pressure cooker that was perfect for making candy, along with a small booklet of candy recipes. Sharrock went on to try to preserve the candy recipes from earlier generations, which lends her cookbook an air of nostalgia. Reading through the recipes, I get the sense that these candies populated the tables at church bazaars and community potlucks, in the days before mass-produced sweets took their place.

This means that for the most part, the recipes use ingredients that you’d easily find at the supermarket. The few specialty items, like candy coating, can be found at baking supply stores. But, just because these recipes are old fashioned, doesn’t mean that they’re all unsophisticated. The pralines, divinity, and nougats would make a sweets table shine and even recipes that were thought of as homey, like taffy, seem very impressive these days. You won’t learn skills like tempering chocolate or making marshmallows from scratch, but once you’ve mastered this book, taking your candy making to the next level will be a breeze.

What I like best about this book is that it teaches you a wide range of candy making skills, includes troubleshooting advice and photo demonstrations, and even guides you through the steps you’d need to take if you were trying to recreate a favourite candy without the recipe.

I think after working through some of Sharrock’s categories of sweets, next year’s holiday treat boxes will be the best they’ve ever been. In the meantime, I’m going to give Sharrock’s tuxedo fudge another try. I forgot to put the coconut into the bottom layer and added it to the top, instead. As a result, the bottom is creamy, but the top is a bit dry. Following the instructions should make my next attempt perfect. Thanks to Robert Robert Rose, Inc., I’m sharing the recipe with you. If you’re still on holidays next week, it would be a great way to start filling your freezer with goodies before the New Year’s resolutions set in.

Boxed

Tuxedo Fudge

Makes about 3 1/2 lbs (1.75 kg)

8- or 9-inch (20 or 23 cm) square pan, lined with parchment or buttered
2-quart heavy saucepan
Candy thermometer

Coconut Layer
2 cups (500 mL) granulated sugar
Pinch salt
1/2 cup (125 mL) butter or margarine
1/4 cup (60 mL) light (white) corn syrup
1/2 cup (125 mL) milk
1 tsp (5 mL) vanilla extract
1/2 cup (125 mL) sweetened flaked coconut

Chocolate Layer
2 cups (500 mL) granulated sugar
2 tbsp (30 mL) unsweetened cocoa powder
Pinch salt
1/2 cup (125 mL) butter or margarine
1/4 cup (60 mL) light (white) corn syrup
1/2 cup (125 mL) milk
1 tsp (5 mL) vanilla extract
1/2 cup (125 mL) pecans, in large pieces (optional)

1. To make the coconut layer: In heavy saucepan over low to medium-low heat, bring the sugar, salt, butter, corn syrup and milk to a boil, stirring until the sugar dissolves and the mixture begins to boil. Cover and cook 2 to 3 minutes to dissolve the sugar crystals on the sides of the pan. Remove the lid. Cook, stirring only as needed to prevent scorching, to the soft ball stage (234°F to 240°F/112°C to 116°C, with 236°F/113°C recommended).
2. Remove from the heat. Cool slightly, about 10 minutes. Add the vanilla. Beat by hand until the candy begins to thicken and lose its gloss. Stir in the coconut. Spread the candy into the prepared pan. Cool at room temperature while making the chocolate layer.
3. To make the chocolate layer: In a clean saucepan, combine the sugar and cocoa until well blended. Add the salt, butter, corn syrup and milk. Bring to a boil over low to medium-low heat, stirring until the sugar dissolves and the mixture begins to boil. Cover and cook 2 to 3 minutes to dissolve the sugar crystals on the side of the pan. Remove the lid. Cook, stirring only as needed to prevent scorching, to the soft ball stage (234°F to 240°F/112°C to 116°C, with 236°F/113°C recommended).
4. Remove from the heat. Cool slightly, about 10 minutes. Add the vanilla. Beat by hand until the candy begins to thicken and lose its gloss. Stir in the pecans, if desired. Spread the chocolate layer over the coconut layer in the pan. Cool and cut into squares. Store in an airtight container.

Gift Giver’s Guide: For the sweet tooth, the nostalgic, and the cook who wants to extend their gifts from the kitchen beyond cookies and squares.

You can find the rest of this year’s reviews here and here..

Holiday Book Reviews – Plenty More

/home/wpcom/public_html/wp-content/blogs.dir/ba0/6971813/files/2014/12/img_3269.jpg

I don’t know about you, but this is the week when my Christmas shopping always begins in earnest. So, for the second year in a row, I’m bringing you three book reviews to help you cross a few names off your list.

I received a review copy of Plenty More from Appetite by Random House Canada. Nevertheless, all opinions in the following post are my own.

It’s only been in the last couple of decades that North Americans have rescued vegetables from their role as either abstemious “rabbit food” or underloved sidekick. Even today, many restaurants use vegetables more as a garnish than a true part of the meal on the plate. As much as I love a good steak, I’ve always craved more than a tiny pile of over-steamed carrots to accompany them. I want vegetables to receive the same care and attention, and creativity, that is brought to the proteins and starches in my meal.

At home, there are plenty of great cookbooks that celebrate proteins, side dishes, and desserts, but until recently, scant attention has been paid to vegetables. Yotam Ottolenghi, along with writers like Deborah Madison and Barbara Kafka, has changed all that.

I’ve been a fan of Ottolenghi since I discovered his Guardian column on vegetarian cooking a number of years ago. Not only did he make vegetables the centre of attention in his dishes, but he used them as a canvas for many of the herbs and spices that were just coming to the attention of British, Australasian, and North American eaters. Middle Eastern flavours like za’atar and harissa were showing up with the proteins on restaurant menus. Ottolenghi’s column, then his cookbook Plenty, sent vegetarians and vegetable-lovers to the spice rack, too.

When I found out he was coming out with a sequel to Plenty, I was excited. My copy has seen a lot of use and I was ready for more recipes. Unlike Plenty, which is organized by vegetable type, Plenty More‘s chapters cover techniques, from tossing to roasting to baking. It’s an evolution from exploring vegetables to becoming so comfortable with them that experimentation begins.

When I got my copy of Plenty More, I took the Roasting chapter for a spin, first thing. In the cold damp of a Vancouver winter, roasted meals warm the kitchen and the belly. I started with Squash with Cardamom and Nigella Seeds, which I served with a Moroccan tagine. Then, I tried the recipe I’m sharing with you today.

One of the reasons I think people believe vegetables are boring is because we’re afraid to work with them as vigourously as we do a piece of meat. Even roasted vegetables can be a bit wan if you don’t allow them to brown and caramelize. That’s one lesson Plenty More brings home. Both the recipes I tried allow the dish to develop the smoky, jammy flavours that come only when you roast something fearlessly.

This recipe gives you perfectly tender carrots with a crust of caramelized honey and accompanies it with a fresh yogurt and tahini sauce that provides a wonderful counterpoint to the dish.

/home/wpcom/public_html/wp-content/blogs.dir/ba0/6971813/files/2014/12/img_3270.jpg

Honey-Roasted Carrots with Tahini Yogurt

Serves Four

scant 3 tbsp/60 g honey
2 tbsp olive oil
1 tbsp coriander seeds, toasted and lightly crushed
1 1/2 tsp cumin seeds, toasted and lightly crushed
3 thyme sprigs
12 large carrots, peeled and cut into 3/4 by 2 1/2-inch/2 by 6-cm batons (3 lb/1.3 kg)
1 1/2 tbsp cilantro leaves, coarsely chopped
salt and black pepper

Tahini yogurt sauce
scant 3 tbsp/40 g tahini paste
2/3 cup/130 g Greek yogurt
2 tbsp lemon juice
1 clove garlic, crushed
salt

Preheat the oven to 425°F/220°C.

Place all the ingredients for the tahini sauce in a bowl with a pinch of salt. Whisk together and set aside.

Place the honey, oil, coriander and cumin seeds, and thyme in a large bowl with 1 teaspoon salt and a good grind of black pepper. Add the carrots and mix well until coated, then spread them out on a large baking sheet and roast in the oven for 40 minutes, stirring gently once or twice, until cooked through and glazed.

Transfer the carrots to a large serving platter or individual plates. Serve warm or at room temperature, with a spoonful of sauce on top, scattered with the cilantro.

/home/wpcom/public_html/wp-content/blogs.dir/ba0/6971813/files/2014/12/img_3271.jpg

Once you’ve tried this dish, I suspect that you’ll be buying a copy for yourself as well as the person you were shopping for. I love that I can adapt most of these recipes easily for my vegan partner, while making the meat-eaters at my table forget that they’re being served a vegetarian meal.

Gift Giver’s Guide: For the vegetable lover, the curious cook, the flavour-seeker, and anyone who needs convincing that vegetables can be the star of the show.

Come back Tuesday for a review of a book that will fill your holiday sweets table with goodness.

Holiday Book Reviews – The Healthy Slow Cooker

Closeup

I don’t know about you, but this is the week when my Christmas shopping always begins in earnest. So, for the second year in a row, I’m bringing you three book reviews to help you cross a few names off your list.

I received a review copy of The Healthy Slow Cooker, Second Edition from Robert Rose Inc. Nevertheless, all opinions in the following post are my own.

I know that I post a lot about French food and desserts around here, but most of the time I try to cook healthy meals. It might seem challenging to do so when trying to balance the needs of an omnivore with a vegan-ish, gluten-free eater, but it isn’t really. We never ate very much bread with our meals and there are plenty of great grains that can satisfy our carbohydrate requirements. As for protein, I’ve always been of the mind that meat and dairy shouldn’t be the primary focus of weekly meals, so we were already eating a largely plant-based diet before my partner started his move toward veganism.

What can be challenging is making sure we have enough variety in our diet, so that we’re covering all the nutrient groups as we eat across the week. It’s easy to get into a routine, making the same few dishes over and over, with a little experimentation on the weekends. Much better to find ways to change things up more frequently.

One of my favourite ways to do that is to make use of my slow cooker. Not only can I fill it and forget it for the workday or overnight, having a large slow cooker means that I can make recipes in quantities that allow me to package and freeze several meals’ worth.

Unfortunately, a lot of slow cooker cookbooks focus on heavy meals that cycle through a limited roster of protein-starch-vegetable combinations. So, I was happy to find The Healthy Slow Cooker has a variety of recipes, both meat and plant-based, with a focus on using nutrient-dense ingredients. The best part is that all the recipes are gluten-free.

Judith Finlayson is well-known to Canadians as a writer and editor, but has become especially famous for her prolific publication of useful cookbooks. Many of them are slow cooker cookbooks, focusing on different health needs or dietary practices. The Healthy Slow Cooker is in its second edition, which came out earlier this year. This means that the recipes are updated, but more importantly, the nutrition tips and health information are more current now, too.

Those tips and information boxes, called “Mindful Morsels” and “Natural Wonders” are a welcome feature of Finlayson’s book. There are the kinds of information you might expect, like the sections breaking down the nutritional benefits of mushrooms or bell peppers, which help bring home the reasons for eating a wide variety of foods. But there are also sections that go into more depth, explaining the role of elements like fatty acids and micronutrients in our diets, why some foods which should always be bought from organic sources, or shopping with environmental concerns and sustainability in mind.

The recipes come from a number of culinary traditions, including Caribbean, Indian, Middle Eastern, and Asian flavours. They also make use of common ingredients, without ignoring some of the ingredients (think edamame or sunchokes) that have been showing up more and more in markets. There are lots of vegan or vegetarian dishes, while many of the recipes that weren’t explicitly vegetarian or vegan could easily be converted, like her Sweet Potato Coconut Curry. And most of the truly meat-based meals are freezable, ready for those times when I’m eating solo.

When I was deciding which recipe to share with you, I thought about how much of a boon fresh, vibrant food is on the winter table. Even though summer vegetables are long gone, many of them are available frozen, almost as nutrient-rich as when they were picked. Finlayson’s take on succotash was exactly what I was looking for, incorporating corn, roasted red peppers, tomatoes, and edamame with the warmth of paprika. It’s bright on the table, filling, and a good match for many different main courses. Best of all, it’s freezable, letting you enjoy it across the coldest months. (If you make it in summer, you can use garden-fresh ingredients and freeze some of it for winter.)

New Age Succotash

reprinted with permission from Judith Finlayson’s Healthy Slow Cooker

Serves 8

1 Medium to large (3 1/2 to 5 quart) slow cooker

1 tbsp (15 mL) olive oil
2 onions, finely chopped
4 stalks celery, diced
2 carrots, peeled and diced
4 cloves garlic, minced
1 sprig fresh rosemary or 2 tsp (10 mL) dried rosemary leaves, crumbled
1/2 tsp (2 mL) salt
1/2 tsp (2 mL) cracked black peppercorns
1 can (28 oz/796 mL) no-salt-added tomatoes, including juice, coarsely chopped
1 1/2 cups (375 mL) vegetable stock
4 cups (1 L) frozen shelled edamame
2 tsp (10 mL) paprika, dissolved in 2 tbsp (30 mL) water
4 cups (1 L) corn kernels, thawed if frozen
2 roasted red bell peppers, diced
1/2 cup (125 mL)finely chopped parsley leaves

In a skillet, heat oil over medium heat. Add onions, celery and carrots and cook, stirring, until softened, about 7 minutes. Add garlic, rosemary, salt and peppercorns and cook, stirring, for 1 minute. Stir in tomatoes with juice and vegetable stock and bring to a boil. Transfer to slow cooker stoneware.

Add edamame and stir well. Cover and cook on Low for 8 hours or on High for 4 hours, until mixture is hot and bubbly. Stir in paprika solution. Add corn, roasted red peppers and parsley and stir well. Cover and cook on High for 15 minutes, until corn is tender and mixture is heated through.

Variation
Spicy Succotash: For a livelier dish, stir in 1 can (4.5 oz./127 mL) mild green chiles along with the red peppers.

This is a terrific side for a braised tofu dish, or more traditionally, for a big platter of ribs. Finlayson includes a recipe for a corn and chile polenta in the cookbook, which would be a nice addition to either of these meals. Really, though, this dish would fit whenever you’d otherwise consider serving the usual boiled, steamed (or canned) vegetables.

I’ll be coming back to this cookbook often, both for the recipes and the information.

Gift Giver’s Guide: For the busy, the gluten-free, and those who want variety and flavour in their healthy menus.

Come back tomorrow for a review of a book that brings vegetarian eating to a new level.

Baking Chez Moi – The Rugelach That Won Over France

Rugelach

I’ve made rugelach before, over at The Family That Bakes Together with my nieces, so I was curious to see how this recipe compared to that one. Those rugelach were filled with rich apricot lekvar, lots of cinnamon sugar, and a mix of fruit and nuts. My nieces also inadvertently rolled them along the short end, creating pinwheels which were huge – and a huge hit with everyone that tasted them.

So, I was curious to try Dorie’s chocolate version. I used a semisweet chocolate that was a little darker than was called for and substituted dried cranberries for the cherries, but otherwise stuck to the recipe. The dough was surprisingly easy to work with for something that soft, though getting the rolls started needed a little gentle help from my bench scraper. I left three of the rolls in the freezer and sliced and baked the other.

The oven I used seems to run a touch hot, so the rugelach were a bit browner on the bottom than I’d like. Next time, I’ll turn down the heat a touch and perhaps take them out sooner, too.

I was a little disappointed with them when I first tasted them – they seemed a bit dry and the flavours didn’t meld very well. But, the next day the leftovers were terrific. The flavour of the cream cheese dough became more pronounced and the filling was moist and delicious.

I still love the version we made for Baking With Julia best, but I think I’d like to have rolls of both kinds of rugelach in the freezer, to serve together. I’ll just bake this version a day ahead.

A very happy Chanukah to everyone who observes it! I hope these eight days are filled with food, family, and friends.

You can find the rest of the Tuesdays with Dorie crew’s entries on this recipe here: The Rugelach That Won Over France.

Baking Chez Moi – Cranberry Crackle Tart

IMG_3056.JPG

Our second Baking Chez Moi recipe is deceptively intricate looking. It’s a simple meringue tart on a pâte sablée base. It’s easy to put together, but the results are sophisticated in look and flavour. I made a gluten-free version of Dorie’s sweet tart dough for this one and as I’ve told you before, my gluten-free conversion of this dough needs a little refinement. The tender crust crumbled as I cut it, but it didn’t matter, because it tasted delicious. If I had been serving it for guests, I suppose I could have called it a cranberry meringue on sable cookie dirt and gotten bonus points for cheffiness. (Those of you who know me know I’d be too busy parsing my mistakes.)

I’ve got a disk of regular sweet tart dough in the freezer, so I’m going to make this again for the rest of my family during the holidays this year. In the meantime, Kevin and I are going to enjoy the leftovers of this one. The contrast between the tart cranberries and the sweet, melting meringue is wonderful, especially with the shards of cookie-ish crust.

If you’d like to try this tart for yourself, you can find the recipe on Dorie’s website. It’s a perfect, pretty dessert for the holiday table.

IMG_3058.JPG

You can find the rest of the Tuesdays with Dorie crew’s entries on this week’s recipe here: Cranberry Crackle Tart.

West Coast Christmas Show

I attended the West Coast Christmas Show as a media guest, but had no obligation to review or write about any aspect of the show. All opinions are my own.

Decorations

Last weekend, Abbotsford’s Tradex transformed itself into a winter wonderland of gifts, family activities, and holiday entertainment. The West Coast Christmas Show had come to town. And the Fraser Valley rushed in the door to welcome it. I was glad we went first thing Saturday morning, because by lunchtime, the crowds really started to arrive.

Gifts

I wasn’t surprised, because the show was justifiably popular. Over the course of our time there, we found handcrafted gifts, all the treats and ingredients you could want for the holidays, and Christmas decorations, flowers and wreaths – along with more gadgets than I’ve seen since last year’s Home Show.

More food

Here are just a few of the things that stood out for me:

Frost Bites Syrup Co. broad range of flavours
Sharon Hubbard‘s whimsical castles
Edible Gardens‘ line of balsamic vinegars
Clearbrook Coffee Company – nothing like locally roasted beans
a paper {life}‘s creative quilling
It’s For the Birds‘ seedcakes

Kids

I was also impressed by how much there was for kids to do at the show. While their parents may have come for the cooking demos and entertaining tips, there were also workshops galore for the small set, along with attractions like Santa’s mailbox and a beautifully set up model train.

More Gifts

Events like this have convinced me that for Fraser Valley residents, there’s no longer any need to drive into Vancouver for trade shows and artisan showcases anymore. What isn’t being produced in your own backyard is coming to meet you at showcase centres like the Tradex.

Food

And there are more attractions to come for the Fraser Valley this holiday season. I was able to get a sneak peek at one of them while I was visiting the Christmas Show. North Pole BC‘s Festival of Christmas opens its doors at the Tradex on November 28th and I got to have a little look around at what you can expect. I even caught Santa napping beneath the Christmas tree.

Preview

To A New Year

Jars

Here’s to an end to the old year’s sorrow, but remembrance of the things that made it bright. Here’s to less static and more signal; fewer fights and more friendship; less holding back and more living.

I hope that 2014 brings you joy where you can find it, with love and support when you can’t.

FFWD – Recipe Swap Onion “Carbonara” (A French Fridays Catch Up)

carbonara

It’s the eve of Christmas Eve and I’m getting ready for a day of massive baking tomorrow, as I’m on Team Dessert for the big family Christmas this year. (I won’t be making many cookies, though, since I was lucky enough to win this from the lovely fellows at Boys Own Bakery.)

Tonight, however, was about relaxing and catching up on last week’s French Fridays dish. Onion Carbonara has a long history, as Mary relates in her post. Unlike its originators, I wasn’t attracted by the economics of the dish, but by the promise that it was one of those gluten-free dishes that doesn’t pale by comparison to the original.

In this version, steamed onions replace spaghetti as the anchor of the dish. It’s billed as an appetizer or a side, but I made two-thirds of the recipe and we had it as our main course. The steamed onions were sweet and crunchy, setting off the rest of the components so nicely that I didn’t miss the pasta at all. I do think that I’d like this version over pasta, too, and a number of other Doristas did just that.

I hope that you are surviving the whirlwind of the holidays, whatever you celebrate, and that you have lots of opportunity to enjoy good food and company before the turning of the year.

You can find many other blogged descriptions of this FFWD recipe here: Recipe Swap Onion “Carbonara”

‘Tis The Season

DSCF7679

We’re entering the countdown to Christmas now, with a week to go. There’s still time, though, to do a little good while you’re finishing up your holiday preparations. I was thinking about this last weekend, when I attended the Vancouver Giants‘ Teddy Bear Toss night. As you can see, the Giants’ first goal caused a shower of generosity in the form of stuffed animals – more than 10,000 fans threw several hundred of them onto the ice. The toss benefits the Vancouver Province newspaper’s Empty Stocking Fund, the CKNW Orphans’ Fund, and the Lower Mainland Christmas Bureau. It was a feel good event, with stuffed animals flying through the air, a shutout win against one of the Giants’ toughest rivals, and a sense of giving back to the community permeating the happy, friendly crowd .

DSCF7687

However, there’s always more to be done and here are a few organizations that could use your help:

Lookout Emergency Aid Society provides low-barrier services to the homeless and other people in need. They’re accepting cash donations, but are also accepting warm winter clothing, blankets, and gift items for distribution.

RainCity Housing provides low-barrier outreach, shelter, and housing for Vancouverites in need and you can contribute cash or much-needed items for distribution.

Check out the Downtown Eastside Women’s Centre wishlist for things that are always in short supply for their clients.

A donation to Family Services of Greater Vancouver will go toward Christmas hampers for families in need or will help fund their programs throughout the rest of the year.

The Kettle, which does great work in my own neighbourhood, has partnered with Harbour Centre for a donation drive that runs until December 20th.

A Loving Spoonful provides nutritious meals for people with HIV/AIDS throughout the year. Donate to them directly, or support them by attending the All-Star RnB Christmas.

Buying your Christmas tree can be an act of giving, too – Aunt Leah’s Tree Lots raise funds to support foster kids and teen moms.

Finally, if it’s your time you’d like to donate, HuffPo has compiled a list of Christmas volunteer opportunities.

Wherever you live and however you choose to celebrate the holidays and the turning of the year, I hope that it’s a time of peace and abundance for everyone in your community.

DSCF7656