I firmly believe that cooking for others and with others is one of the surest ways to build and support community. It’s the belief that underpins block parties, cookie swaps, and soup swaps, as well as initiatives like the community kitchens that bring vulnerable people together to cook and connect or Montréal’s Newcomer Kitchen that gives space to newly arrived Syrian women to prepare and sell food, establishing themselves in their new home.
For Sharon Hapton, this motivation blossomed into the Soup Sisters and Broth Brothers, a network across 25 Canadian and U.S. cities that brings groups of people together to cook and eat, all for the benefit of women, children, and youth in crisis. A typical monthly gathering yields 150 – 250 litres of soup, which is brought to local shelter partners the next day. Participants benefit from working with a group of like-minded folks, alongside talented chefs that keep everyone on track in the kitchen. While the soup is simmering, those same chefs feed the night’s volunteers, starting with a hearty bowl of soup. It’s an elegantly crafted concept that’s resulted in waiting lists for these monthly gatherings and a steady stream of healthy, lovingly crafted food for folks who need it.
You can learn more about Soup Sisters directly from Sharon, in this interview:
This isn’t my first introduction to Soup Sisters. I’ve been following their work for years and have always wanted to take part in one of their soup-making evenings. I also own a copy of their second cookbook, The Soup Sisters and Broth Brothers Cookbook, which I reviewed in 2015. I turn to it often for recipes and inspiration when I’m in a soup-making mood.
Like their previous cookbooks, the new one features recipes from chefs, bloggers, and Soup Sisters participants, but this time a number of the recipes were contributed by kids and teens. Cooking with young people is the focus of this book, with some tips and advice for getting kids into the kitchen and a host of accessible recipes. Making soup is a great introduction to cooking, especially with kids. It’s a process that can be broken down into many manageable steps, there is always something new happening throughout the process to keep kids interested, and the end result is the kind of meal that people of all ages will enjoy.
Last night’s participants split up into teams, each making one of five soups destined for Sereenas House for Women, a supportive housing program in Vancouver’s Downtown Eastside. All the recipes were from the new cookbook, as was the soup that Chef Tony Minichiello made for our meal. His soup was a recipe from his wife’s family, an Armenian lentil and rice soup that has a deceptively simple list of ingredients for a soup so rich in flavour. My team (which dubbed itself “Team Nourish”) made a Chicken Tortilla Soup that was shared by Earls Restaurants. Other teams tackled Maritime Fish Chowder (Laura Calder), Spaghetti and Mini Meatball Soup (Bonnie Stern), Every Bunny Loves Carrot Soup (Skylar & Chloe Sinow), and Posh-Tasting Red Pepper and Coconut Soup (Taya Groner). Those last two were contributed by young participants and they were in attendance at the event to cook their soups with us.
Our evening started with appetizers made with brioche the cooking school students had made that morning and topped with ricotta, arugula, caramelized onion, and roasted tomato. We were given an introduction to Soup Sisters, a presentation from a representative of Sereenas House, and a talk from Sharon Hapton, introducing the new book and talking about the program’s origins. Then we all went to our stations and started chopping and dicing. In no time at all, it seemed our soups were ready for their long simmer. In part, this was because many hands truly make light work, but it was really the help and guidance of Northwest’s chefs and students that made the work fly. They also kept an eye on our soups while we went off to prepare labels and eat dinner. Our dinner started with Chef Tony’s soup and he talked about the history of the soup in his own family while the bowls were passed down the table. The soup was followed by a salad rich in greens and topped with couscous and our meal finished with slices of light mousse cake that had been prepared for us by the school’s pastry students. After dinner, we ladled soup into containers and each team produced between 25 and 30 litres of soup for donation. I think we all felt a little spoiled and also quite pleased with how much soup we collectively produced.
We all went home with a copy of the cookbook courtesy of Appetite, but I think many of us will also be buying copies to give as gifts this holiday season, especially because the sale of the books helps to support the program. If you’re curious about any of the Soup Sisters cookbooks, they have some sample recipes from the 2nd volume in the series up on their website. I’m happy to have 100 more great soup recipes at my disposal and I’d especially recommend this book to anyone who cooks with kids.
I’d also suggest, the next time you’re considering a gathering for a celebration or a team-building exercise, find out if there is a branch of Soup Sisters near you and book an evening. The fees go toward purchasing the best seasonal ingredients for the soups and you’ll have a richly rewarding experience and a richly delicious meal, to boot.
And so, it’s time to wrap up this year’s Holiday Book Review Series. It’s been an especially good one, don’t you think? I want to thank Raincoast Books for generously sending me review copies of the six books in this year’s series and especially for giving my Canadian readers the opportunity to win a copy of one of them.
I’m ending with a cookbook that will serve you in good stead come January and resolution season. I’m not big on resolutions, but I do hold some intentions each new year. One that’s always on my list is to reduce the amount of waste in my life and to make the best use of the resources I’m lucky enough to have access to. A big part of this for me is reducing my food waste and that’s where River Cottage: Love Your Leftovers comes in. It’s a cookbook, certainly, but it’s also a handbook for making the most of your food and keeping as much as possible out of the waste stream.
Hugh Fearnley-Whittingstall has broadened his definition of leftovers to include more than what’s left in the serving dish after a meal. His recipes tackle the food that often gets discarded in the course of food preparation, like leaves, peels, bones, and rinds. He also includes the results of big batch cooking (or, as he calls them, ‘planned overs’) under the book’s umbrella, so that your fridge and pantry are filled with prepared foods, without the packaging and sometimes dubious quality of the store-bought variety.
The book is organized a little differently than most cookbooks, with chapters built around categories of leftovers, rather than meals or types of recipes. He begins with a discussion of planning for leftovers, with sensible advice from shopping through storage. Before the recipes begin, he shares an infographic of frequently occurring leftovers that serves as an alternate table of contents. His chapter on Launchpads for Leftovers is a condensed version of a conventional cookbook format, running through base recipes for everything from stocks to desserts.
The rest of the book is given over to recipes under categories of the most common leftover foods. He tackles meat, fish, and starches, but also trickier foods like greens, dairy, and eggs. These are the ones that I find most likely to languish in the fridge waiting for inspiration, then ending up in the compost.
And your compost bin will be nearly empty, if you use the many nose-to-tail recipes Fearnley-Whittingstall includes in this book. Fish skins and trimmings can sub in for bacon, potato peels transform into a comforting, creamy soup, and broccoli stems can take the place of meat or fish in a carpaccio. His Vegetable Peel Crisps are typical of this approach. There’s no reason that root vegetable peelings should have to go into the compost, as long as they’re clean and free from bad spots. He tosses them in olive oil, salt, and pepper, then roasts them in a slow oven. When they come out, you can add a sprinkling of smoked paprika, as I did. I used a mix of potato, parsnip, carrot, and yam peelings. I liked them better than potato chips and they’re definitely healthier.
The crisps made a great lunchtime pairing with his Many Bean Salad, which is almost infinitely variable, depending on what you have on hand. I used a mix of beans, but it would have been equally good with lentils, chickpeas, or just about any other sort of pulse. I threw in some tuna (I liked that he specified sustainably fished tuna), celery, Malossol cornichons, celery, red onion, and grated parmesan. I used his recipe for mustardy vinagrette, with pickle brine in place of the vinegar. It’s the kind of salad you can find in other River Cottage cookbooks, but with an extra emphasis on using what you’ve already got on hand.
The leftover ingredients used in each of the recipes is highlighted, so that when you’re skimming through the book, you can note which work with the leftovers you’ve got on hand. It’s another design feature that is meant to make it easy for you to find ways to use up the contents of your fridge and pantry.
A time-honoured method of cleaning out the fridge is to make a soup, and Fearnley-Whittingstall includes a number of soups across his leftover categories. His take on Ribollita was especially inviting during the cold snap we’ve been experiencing in Vancouver. We’ve had snow sticking around for over a week, with more on the way. Warm, rich, filling soup is something I’ve been making a lot of lately.
The Love Your Leftovers version can help use up roasted roots, soup stock, Parmesan rind, pulses, and leftover greens. I skipped the rind and chose vegetable stock, as I’m planning to share the soup with a vegan this week. That didn’t stop me from adding a little Parmesan to my serving, and with the garlicky toast in the bottom of the bowl, it was perfectly delicious.
I’ve been trying to stock my fridge with ‘planned overs’ like big containers of roasted roots for a while, but I can be inconsistent. I keep intending to soak batches of beans on a more regular basis, so I can reduce my use of canned goods a bit (I don’t think I’m alone in this one). I can also be a little forgetful when it comes to leftover stock – there’s really no excuse for throwing out stock, but it’s something that’s happened more than I care to admit.
Scheduling recipes like this soup could help me to get a bit more consistent in the batch preparation I’d like to do more often, while keeping me from wasting staples like stock and greens – so many greens.
I don’t have permission to share the recipe with you, but you can find it on the River Cottage website:
I’ve been a fan of Fearnley-Whittingstall’s recipes for quite a while, especially after working through his River Cottage Veg with the Cottage Cooking Club. However, it’s his approach to food that’s stuck with me even more than his recipes. He uses what’s fresh and seasonal, certainly, but he also stocks his pantry with good quality canned and dried goods, so that delicious weeknight eating is something that can be accomplished year-round.
In that way, this cookbook is the perfect extension of his food philosophy. Not only are his recipes flavourful and accessible, they’re also making the best of every part of the good food he stocks in his kitchen. As much as I like project cooking and baking, special occasion recipes, and rich comfort foods, Fearnley-Whittingstall’s recipes are a better representation of how I prefer to eat most of the time. With River Cottage: Love Your Leftovers on my shelf, I’ll be able to do so even more effectively and sustainably. I think I’d even make a resolution to that effect.
Gift Giver’s Guide: For the thrifty cook, the environmentalist eater, the seasonal gourmet, and the comfort food connoisseur.
*This giveaway is open to residents of Canada. You must have a Canadian mailing address. The winner will be required to answer the following skill testing question: 3 X 64 =_____ This promotion is in no way sponsored, endorsed or administered by, or associated with, Facebook. We hereby release Facebook of any liability. Winner(s) will be contacted by email within 48 hours after the giveaway ends. Entrants must provide a valid email address where they can be reached. Each of the winners must respond to the email announcing their win within 48 hours, or another winner will be chosen. No purchase of any product is required. If you have any additional questions – feel free to send us an email!
You can find links to the rest of my Holiday Cookbook Review Series giveaways here. They’re all open until December 22nd.
I discovered Irvin Lin’s blog, Eat the Love, way back in 2010, when he participated in a round up of gluten-free Thanksgiving dishes hosted by Shauna Ahern of Gluten-Free Girl. I was struck by the creativity of his recipes, his openness to experimentation, and the visual impact of his blog. I loved the voice in his posts, combining stories and recipes in a smart and engaging way, while also genuinely connecting with his readers. His gorgeous creations should have been intimidating, but the way he wrote his descriptions and instructions had the opposite effect – making the reader feel that his projects were doable and that they’d be rewarded with flavour, even if they didn’t achieve picture-perfect results.
Over the years Lin’s blog has only gotten better, so it’s not surprising that he’s come out with a cookbook. It’s one that showcases what’s best about his approach to baking – inventive, playful, rooted in classics, but unafraid to explore new directions. When I first paged through Marbled, Swirled, and Layered, it was the flavour combinations that I noticed first – throughout his primary recipes and variations, he makes choices that show the title of his book doesn’t just refer to his dishes’ structure – he layers, swirls, and marbles flavour, too.
Lin does so with an attention to detail that I suspect comes from his background in design. His recipe titles reflect this – like his Lemon and Fresh Mint Shaker Tart with Masa Harina Crust or Seville Orange Bars with Salted Shortbread and Gin Meringue – but you can follow this precision right into the ingredients list. He uses alternative flours, browns butter, adds fruit or herbs or extracts, all in service of bringing flavours and textures together in inventive and delightful combinations.
For anyone who has been baking for a decade or three, these innovations are fun to try and the finished products are gratifying to serve. For anyone who is just starting out as a baker, his clear instructions will help you create complex and lovely baked goods that will make people think you’re an old hand.
The first recipe I tried, Chocolate, Peanut Butter, and Butterscotch Layered Cookies, is simple enough to make with kids, but its flavours are complex. The bottom layer combines browned butter and brown sugar to make a soft and chewy base that could pass for a peanut butter cookie. But that flavour is hidden in the top chocolate layer, cleverly signaled by a crosshatch.
I made this cookie as a donation to a bake sale table and they disappeared so quickly, I had to go home and make another batch.
My next holiday event was a cookie swap, so I stayed in the Cookies chapter and tried my hand at the Chocolate-Vanilla Checkerboard Cookies. These are old-fashioned butter cookies that are updated with vanilla bean and chocolate extract. They look complicated to construct, but Lin’s instructions walked me through the process quickly and perfectly (though I could use a little more symmetry in my execution).
I baked them all, filling my six-bag quota and bringing the rest to the swap for snacking. I had none to take back home with me.
Well, that’s not entirely true. The scraps from squaring off the checkerboard cookies are layered and twisted into a log, then sliced and baked. I left this log in the fridge, bringing it out to bake for my parents. They didn’t last long, either.
Then, I skipped from the front of the book to the back for Blueberry-Lemon Muffins with Cinnamon-Cardamom Swirl. Whenever I visit my parents, I try to leave them some treats in the freezer to last them until my next visit. These muffins almost didn’t make it there. The spiced swirl through the classic combination of blueberry and lemon makes these muffins pretty irresistible. And the instructions are clear and detailed enough to guide even a beginning baker to muffin success, especially with the helpful end note that explains the muffin method.
The last recipe I tested is also the one I’ve kindly been given permission to share with you – Carrot and Parsnip Layer Cake with Honey-Cream Cheese Frosting.
It’s a showstopper of a cake, but it’s rooted in the kind of cake that many of us grew up eating at picnics and potlucks. I really appreciate the way that Lin takes these old-fashioned favourites and brings them forward into the 21st Century.
The parsnip is an underloved vegetable that can be terrific in savoury or sweet dishes, but is usually relegated to a mash, soup base, or mixed roasted veg. Here it’s paired with its more popular cousin and allowed to shine in its own right.
Lin layers and contrasts flavours in this cake, while choosing ingredients that increase the complexity of texture and taste. It’s a long way from the potluck carrot cakes I remember, but it’s nearly as simple to create.
I actually made this cake twice. The first time was on Thursday morning (when this post was supposed to go up). I’d decided to make it for my parents, so that they could share it with our family and their friends. But, while the layers were cooling, the weather reports got increasingly hysterical and I ended up leaving before I could make the icing and assemble the cake. The promised Vancouver ‘snowpocalypse’ never really happened, but I didn’t have time to bake again until yesterday.
My pans were a little smaller than called for, but quite deep, so I have a taller cake than the original. It makes it a tiny bit unwieldy, but it is also quite spectacular. The contrast in colour between the outer and inner layers is striking and the spices used in each contrast just as beautifully. Almond flour gives the cake a soft texture and subtle nuttiness, while pineapple complicates the sweetness and makes the cake incredibly moist. The honey in the icing deepens its sweetness and compliments the flavours of the cake. And the coconut flakes that garnish the sides add a welcome crunch and another subtle flavour pairing with the pineapple inside.
I’ve been delivering wedges of this cake to co-op neighbours and friends. I’ll be sharing the rest at a committee meeting tomorrow. As with everything I’ve baked so far from this cookbook, there won’t be any leftovers for long.
CARROT AND PARSNIP LAYER CAKE WITH HONEY-CREAM CHEESE FROSTING
Image credit: Linda Xiao. Reproduced by permission of Houghton Mifflin Harcourt.
I’m a creature of habit, so when my friend Annelies invited me to dinner in a neighborhood here in San Francisco that I rarely frequent, I jumped at the chance. Not only did I get to dine at a new restaurant, but I got to hang out with a friend too. After our meal, we agreed to split a dessert and were particularly smitten with the idea of the parsnip cake on the menu. Like carrot, parsnip has a subtle earthy and nutty sweetness when cooked. I’ve taken it even further, though, layering parsnip cake with carrot cake to really up the game. The deeper, almost creamy parsnip makes the common carrot brighter and more vibrant. With honey-sweetened cream cheese frosting and a sprinkling of toasted coconut, this dense winter vegetable cake is now one of my favorites.
CAKE BATTER
3 3⁄4 cups (525 g) all-purpose flour
3⁄4 cup (90 g) almond flour or meal
1 tablespoon plus 2 teaspoons baking powder
1 1⁄2 teaspoons baking soda
1 teaspoon kosher salt
3 cups (600 g) granulated sugar
1 cup plus 2 tablespoons olive oil
1 tablespoon vanilla extract
3 large eggs
1 large egg white
1 cup (6 ounces or 170 g) finely chopped fresh pineapple (or drained canned crushed pineapple)
1 pound (455 g) carrots, finely grated
1 1⁄2 teaspoons ground cinnamon
1 teaspoon ground turmeric
1⁄2 teaspoon ground cardamom
1⁄2 pound (225 g) parsnips, finely grated
1 teaspoon ground ginger
1⁄4 teaspoon ground nutmeg
HONEY–CREAM CHEESE FROSTING
16 ounces (455 g or 2 bricks) cream cheese, at room temperature
1 cup (225 g or 2 sticks) unsalted butter, at room temperature
1⁄2 cup (140 g) honey
1 cup (115 g) powdered sugar
2 teaspoons vanilla extract
TO ASSEMBLE
2 cups (170 g) unsweetened coconut flakes
MAKE THE CAKE BATTER
Preheat the oven to 350°F. Coat three 9-inch round cake pans with cooking spray and line the bottom of each with a round of parchment paper.
Place the flour, almond meal, baking powder, baking soda, and salt in a large bowl and stir vigorously with a balloon whisk until the ingredients are evenly distributed and uniform in color. Place the sugar, oil, and vanilla in the bowl of a stand mixer fitted with the paddle attachment. Beat together for about 30 seconds on medium speed to incorporate. Add the eggs, one at time, beating until each is
incorporated before adding the next, then add the egg white. Scrape down the bowl with a rubber spatula and then add the dry ingredients and mix on low speed until incorporated. Add the pineapple and mix until incorporated.
Scoop about one-third of the batter into a separate bowl. To the remaining larger amount of batter in the mixer bowl, add the carrots, cinnamon, turmeric, and cardamom, and fold to combine. To the second bowl of batter, add the parsnips, ginger, and nutmeg, and fold to combine. Pour the parsnip cake batter into one cake pan and divide the carrot batter between the other two cake pans.
Bake until a toothpick inserted in the middle of the cake comes out clean, 35 to 40 minutes. Let cool in the pan for 15 minutes, then run a thin butter knife around the pan and invert the cakes onto wire racks to cool completely.
MAKE THE HONEY– CREAM CHEESE FROSTING
Combine the cream cheese, butter, honey, powdered sugar, and vanilla in the bowl of a stand mixer fitted with the paddle attachment. Beat until the frosting is pale and fluffy, 3 to 5 minutes. Refrigerate the frosting for at least 30 minutes to firm up.
ASSEMBLE THE CAKE
Toast the coconut in a large dry skillet over medium-high heat, stirring gently, until golden brown (some of the coconut will brown faster than the rest; that’s fine). Immediately pour the coconut into a bowl to cool. Take the frosting out of the fridge and beat on medium speed for about 15 seconds to loosen it up. Place one carrot cake layer on a cake platter or stand, flat side up, and spread some frosting over the top of that layer. Place the parsnip layer over the frosting and repeat. Place the final carrot cake layer over the parsnip layer and frost the top and sides of the cake. Using your hands, pat the toasted coconut all over the sides of the cake. Brush any stray coconut off the platter before serving.
* Unsweetened coconut flakes can be difficult to find. Some upscale grocery stores carry it, and often you can find it in the bulk section, where you can buy just enough for your recipe. At regular grocery stores, if it isn’t stocked in the baking section next to the sweetened shredded coconut, look for it near the dried fruit like raisins, dried ginger, and dried papaya. If you can’t find it, though, the sweetened or unsweetened shredded coconut in the baking section will work. Just toast it over medium-low heat and pay extra attention if you use the sweetened shredded coconut. The sugar in the sweetened coconut will caramelize and burn faster than unsweetened shredded coconut.
I feel as though I’ve just scratched the surface of this cookbook. There are tarts, bars, and cobblers I can’t wait to try; deceptively humble quick breads alongside project bakes that are beautifully simplified. There are even a few savoury baked goods along the way.
Lin’s regard for his audience and enthusiasm for his art come through in his recipes, his headnotes, and in the helpful guides he provides throughout. He even includes recipes for his favourite gluten-free flour blends, making his baking as accessible as possible. Paired with his terrific instruction and delicious flavours, it’s no wonder this book is making all the year-end ‘best of’ lists.
Gift Giver’s Guide: For the modern baker, the discerning dessert-maker, the best guest, and the playful patissier.
Come back on Saturday for a review of a book that will solve all your holiday postprandial dilemmas.
*This giveaway is open to residents of Canada. You must have a Canadian mailing address. The winner will be required to answer the following skill testing question: 16 X 37 =_____ This promotion is in no way sponsored, endorsed or administered by, or associated with, Facebook. We hereby release Facebook of any liability. Winner(s) will be contacted by email within 48 hours after the giveaway ends. Entrants must provide a valid email address where they can be reached. Each of the winners must respond to the email announcing their win within 48 hours, or another winner will be chosen. No purchase of any product is required. If you have any additional questions – feel free to send us an email!
You can find links to the rest of my Holiday Cookbook Review Series giveaways here. They’re all open until December 22nd.
I received a review copy of Better Baking from Raincoast Books. Nevertheless, all opinions in the following post are my own.
I’ve often thought that most people approach healthy baking the wrong way ’round. We’re encouraged to focus on superfoods and buzzy ingredients, replacing what we know isn’t so good for us with something that may not live up to the original’s standards. So, as much as I enjoy the flavours of coconut and date, together or separately, lately it’s felt like the same dessert is packaged in different shapes and asked to stand in for Nanaimo bars, truffles, chocolate cake, or almost any other treat you can think of.
For Genevieve Ko, on the other hand, flavour comes first. In fact, this book has its genesis in an effort to substitute for ingredients she’d run out of, rather than ones she was trying to avoid. Ko realized that she could improve on traditional recipes using more interesting (and healthier) ingredients and satisfy eaters’ cravings for treats and nutrition all at once. Her experiments have produced a book that’s full of recipes that cut back on refined ingredients without sacrificing flavour or texture. And with the range of ingredients she’s included in these recipes, there’s no danger of falling into the trap of producing the same flavours over and over again.
In some of the recipes, the effects can be subtle. Her Olive Oil-Brown Sugar Pumpkin Bundt Cake doesn’t declare itself as a healthier version of a traditional autumn cake. Ko substitutes some of the all-purpose flour with white whole wheat flour, while replacing some of the fat and sugar with applesauce. The result is an incredibly moist cake with a delicate crumb, benefitting from the nuttiness of whole wheat without any of its heaviness. I used homemade pumpkin purée and applesauce, which made me feel extra-virtuous, but store-bought would have worked, too.
The ingredients for this cake were all pantry staples, or ones easily obtained at the grocery store. That’s true for many of the recipes in Better Baking, but Ko also makes use of ingredients that may be unfamiliar to some bakers, or at least underused. Spelt and rice flours, chia seeds and millet, matcha tea and mochi flour – and dates and coconut, too – these are only a few of the ingredients that you might be adding to your pantry after reading through this cookbook.
A good place to start would be to add some buckwheat to your pantry. It’s something that many of us associate only with pancakes, but Ko makes the most of it, putting it through its paces in both flour and groat form in granolas, quick breads, and cakes. Her Buckwheat-Cocoa Banana Bread Bars, which you can see at the top of this post, are also gluten-free.
Like her approach to making baked goods healthier, Ko presents recipes that are gluten-free, vegan, or free of various allergens in a straightforward way. Each of her recipes notes if it’s suitable for any of these diets near the top of the page and she includes a secondary index for special diets, for quick reference. None of these recipes come across as trying to compensate for the ingredients they lack. They’re collected here because they’re terrific in themselves. They also happen to be suitable for a particular diet.
These buckwheat bars were the first recipe I made when I received the book. I kept a few for myself, but packed the rest up and sent them home with my mother. She brought them to her women’s league meeting the next day and all the ladies were clamouring for the recipe. One woman was particularly pleased. She must follow a gluten-free diet and rarely gets to sample any of the treats that are brought to their meetings.
I found the combination of buckwheat and banana to be an irresistible pairing, so it’s probably good I sent most of the batch away. Gluten-free quick breads are also more forgiving than ones made from traditional flour, as it’s overworking the gluten that can make them tough. This is a great back pocket recipe for whenever there are very ripe bananas on hand.
The last recipe I made for this review had an ingredient that can sometimes be overused as a substitute in vegan baking. Chia seeds are often used as an egg substitute or as a pudding. Sometimes this works beautifully and sometimes it can result in desserts that evoke a 1970s health food store.
In Better Baking, chia seeds are used as a crunchy element in biscotti, almost popping with flavour with each bite. I made the Cranberry Pistachio version of the biscotti and I’ve been giving permission to share the recipe with you. These cookies have some whole wheat flour, which enhances the flavour and makes them less brittle than most biscotti. Apple and orange juice help to sweeten the cookies and add even more dimension to their flavour. I’ll be making these again for Christmas and if anyone hesitates over going back for seconds, I’ll make sure to point out all their healthful elements.
Cranberry Chia Biscotti
Chia seeds have a pippy little crunch that is perfect for biscotti. Together with the whole wheat flour, the seeds give this shortbread-like dough more body, with a full flavor and hearty texture. For the holidays, I bake the pistachio variation that follows to get a pretty burst of green with the red berries.
Makes about 4 dozen
No nuts
1/4 cup (55g) unsweetened pomegranate or apple juice
1 cup (160 g) dried cranberries
1 cup (142 g) unbleached all-purpose flour, plus more as needed
3/4 cup (113 g) whole wheat flour
2 tablespoons chia seeds
1/2 teaspoon baking powder
1/8 teaspoon salt
1/2 cup (104 g) sugar
1 small orange
1/2 teaspoon pure vanilla extract
6 tablespoons (84 g) unsalted butter, softened
1 large egg, at room temperature, beaten
Position a rack in the center of the oven and preheat to 325°F. Line a half sheet pan with parchment paper.
Pour the juice over the cranberries in a small microwave-safe bowl. Microwave in 30-second increments, stirring between intervals, until the juice is absorbed, 1 to 2 minutes. Cool completely.
Whisk both flours, the chia seeds, baking powder, and salt in a medium bowl. Put the sugar in a large bowl and zest the orange into it. Squeeze 1/4 cup juice from the orange and reserve.
Add the vanilla to sugar and beat on low speed with a electric mixer until the sugar is evenly moistened. Add the butter and, gradually raising the speed to medium-high, beat until pale and fluffy. Scrape the bowl. Turn the speed to medium, add the egg, and beat until well combined. Scrape the bowl. Turn the speed to low and gradually add half the flour mixture, beating until all traces of flour have disappeared. Add the orange juice and beat until incorporated, then add the remaining flour and the cranberries and beat just until no dry bits remain and the dough forms large clumps. Transfer the dough to the prepared pan. Dampen your hands, divide the dough in half, and form into two 12-by-1-by-1-inch logs, spacing them 5 inches apart.
Bake until the logs are golden brown and firm, about 35 minutes. Cool on the pan for 10 minutes. Raise the oven temperature to 350°F.
Slide a still-warm log off the parchment onto a large cutting board. Using a serrated knife, cut it into 1/2-inch-wide slices. Arrange 1/4 inch apart on an unlined half sheet pan, cut sides up. Bake until toasted and light golden brown, 11 to 13 minutes. Cool completely on the pan on a wire rack.
Meanwhile, cut the second log into slices. Remove the parchment from the sheet pan and arrange the sliced biscotti on it. Bake after the first pan comes out.
Cranberry Pistachio Biscotti
Add 1 cup (128 g) shelled roasted unsalted pistachios to the batter along with the cranberries.
Make ahead
The biscotti will keep at room temperature for up to 5 days or in the freezer for up to 2 months.
Better Baking takes its user from breakfast through dessert, with a few surprises along the way. There are a handful of savoury recipes and some stovetop puddings that I’m very happy Ko included. There are solidly American desserts, while others are European-inspired or Asian-influenced. Even her simplest recipes are elegant, but there are also stunning showpieces like her Green Tea Leaves.
There are many things I appreciate about this cookbook and the healthfulness of the recipes isn’t even at the top of my list. Ko’s recipes don’t feel like a repetition of ones I’ve already got in my collection. They feel like fresh takes on even the most traditional recipes, like her Flourless Blueberry Muffins. I’m looking forward to trying her recipes that explore underused ingredients or take well-known ones in different directions. I love the tips that she shares for each category of baked goods and her guides to ingredients and substitutions. She incorporates accommodating special diets seamlessly, reflecting the way people today negotiate each other’s dietary needs. Most of all, I love how well the recipes I’ve tried so far work and how delicious they’ve been.
Raincoast Books has been generous enough to offer a copy of Dorie’s Cookies to one Canadian reader. You can find the giveaway here and enter until December 22nd: Win a copy of Better Baking*
Gift Giver’s Guide: For the modern baker, the discerning dessert-maker, the sensible snacker, and the pantry explorer.
Come back next week for a review of a book that is full of inventive flavour mash ups.
*This giveaway is open to residents of Canada. You must have a Canadian mailing address. The winner will be required to answer the following skill testing question: 8 X 54 =_____ This promotion is in no way sponsored, endorsed or administered by, or associated with, Facebook. We hereby release Facebook of any liability. Winner(s) will be contacted by email within 48 hours after the giveaway ends. Entrants must provide a valid email address where they can be reached. Each of the winners must respond to the email announcing their win within 48 hours, or another winner will be chosen. No purchase of any product is required. If you have any additional questions – feel free to send us an email!
You can find links to the rest of my Holiday Cookbook Review Series giveaways here. They’re all open until December 22nd.
I received a review copy of Dorie’s Cookies from Raincoast Books. Nevertheless, all opinions in the following post are my own.
If you were lucky, when you were young there was a parent or family member, a caregiver or teacher, who instilled in you a love of tasting and experimenting in the kitchen. If you were especially lucky, you had people in your life that didn’t just like to cook, but baked, too. The measuring and stirring done by young hands can become a rhythm in later life, a refuge in hard times and an expression of joy in good ones.
This sort of passing on of knowledge fell out of fashion for a generation or two in large swaths of North America, so you might find you’re one of the many who must teach themselves the skills they need in the kitchen, or at least find some good teachers.
The good news is that you’re not alone. Dorie Greenspan taught herself to bake when she was a young woman and she found many good teachers along the way. I suspect that’s why she’s become such a good teacher herself. When you read the instructions in her recipes, it’s as though she’s standing beside you, pointing out the change in the feel of a dough that indicates it’s ready, or showing you a trick to help you make the perfect roll of cookie dough. This steadiness in her instructions makes it possible to accomplish complicated feats in the kitchen, but it also helps to make staple recipes part of the rhythm of your own kitchen style.
I was first introduced to Dorie’s cookbooks when I joined French Fridays with Dorie, which cooked and baked through her book, Around My French Table. I can make staples like her tart dough without reference to a recipe, and I apply many of her techniques to the recipes I encounter elsewhere. Just today I was making citrus scones and, unbidden by the recipe, took the time to rub the orange zest into the sugar before proceeding. I’ve done so since Dorie introduced me to the trick – it helps to distribute citrus oil evenly and deliciously through the baked good. Even though I was lucky enough to have fantastic bakers and cooks who guided me in my childhood, I’ve been very glad to find a talented teacher like Dorie through her books. My cooking and baking are all the better and more pleasurable for it.
None of this might seem relevant to cookies, which are often seen as the simplest of baked goods. But, simple recipes benefit from good technique and helpful tricks, while more complicated cookies like macarons need a sure guide to keep the novice from disaster.
And her instructions might not be the first thing on your mind when you page through Dorie’s Cookies. There are more than 160 recipes in the book – many more if you include the variations. There are cookie jar cookies and holiday tray cookies, high tea cookies and savoury cocktail cookies, bake sale snack bars and indulgent squares. Some of her recipes are the very best version she’s found of a classic, others are beautifully realized experiments in flavour or form. There are classically American cookies and unabashedly French ones, just as you’d expect from a baker who splits her time between the two countries, but other recipes reflect the global flavours that run through the contemporary cultures of both places.
Her cookie recipes are complemented by the recipes in her “go-alongs and basics” chapter. Along with fillings, toppings, and accompaniments, this chapter includes the two recipes that I think I’ll be baking from memory before long – Dorie’s Do-Almost-Anything Vanilla and Chocolate cookie doughs. Each of the doughs has four associated recipes in the book, but Dorie encourages bakers to take them in any direction they’d like. One baker I’ve seen on Instagram has even combined them for a lovely two-toned effect, using cookie cutter cut outs.
You can see my first try with her chocolate version at the top of this post. I made a half-batch of the recipe and topped the rounds with the almond meringue from her Chocolate-Cranberry and Almond Cookies. I was out of cranberries, so I added a little cardamom to the meringue. The dough is easy to work with and bakes into a perfect wafer.
Almost as perfect a wafer as the one I baked for her Chocolate Crème Sandwiches, now dubbed the “Dorieo” on social media. I like them better than the commercial cookie and this dough is another that is easy to put together and work with. I made a slightly more adult version of the filling, using Irish Cream in place of the vanilla and do not regret it at all.
Nor do I regret revisiting Dorie’s almond meringue topping when I made her Swedish Visiting Cake Bars. This meringue is usually seen on fruit tarts, but I love the way Dorie has adapted it to cookies. The chewy almond cake base is thin, to maximize the cake-meringue ratio. The contrast in texture and the double-almond flavour made this a hit. They didn’t last long.
The book is full of clever flavour mash ups like this one or the Honey-Blue Cheese Madeleines in the savoury “cocktail cookies” chapter. There are also techniques that you’ll be surprised you lived without. My favourite in this book is her substitution of muffin tins for baking rings. Many of the cookies from Dorie’s famed beurre & sel cookie collection can be baked using this method. It gives the cookies a very slightly slanted edge (at least in my muffin tins), a surprisingly sophisticated finish from such a humble kitchen tool.
It worked beautifully for me when I made Dorie’s Double-Ginger Molasses Cookies. They looked like tiny, perfect bakery bites. This dough doesn’t even have to be rolled out. It’s formed into balls, as a typical ginger snap would be, rolled in sugar, then pressed into muffin cups with the bottom of a glass. It’s an extra step that doesn’t take much time, but creates a lovely effect.
I’ve received permission to share this recipe with you, so you can try this technique for yourself. You’ll be rewarded with a cookie that is much richer than a ginger snap. The addition of crystallized ginger, cocoa powder, chocolate chips, and instant espresso intensify its spiciness, without creating competing flavours. They’ll be showing up again in my home before the holiday season is through.
Double-Ginger Molasses Cookies
Image courtesy of Houghton Mifflin Harcourt Publishing Company
I have my friend Christine Beck, who is, like me, a Paris part-timer, to thank for this recipe. The cookies belong to the chewy-molasses-cookie family, but they have so much flavor and so many surprises that they transcend the familiar. For starters, there’s both crystallized ginger and powdered ginger, lots of chopped dark chocolate and an optional bit of instant espresso too, which I tacked onto the recipe because I’m an incorrigible tinkerer. I also tinkered with the way these are baked. Classic molasses cookies are scooped, molded into balls, rolled in sugar and then pressed with a fork before baking, and you can make these cookies that way. Or you can do what I do: Mold them in muffin tins, which turn out more uniformly shaped cookies that teeter on the brink of becoming gingerbread cakes. A word on crystallized ginger: Crystallized, or candied, ginger is sliced fresh ginger that is cooked in syrup, dredged in sugar and dried. You can usually find it in the supermarket alongside other dried fruits or in the spice section. If the ginger isn’t moist and pliable, steam it before using: Put it in a strainer over a saucepan of simmering water, cover and let warm and soften for about 5 minutes; pat dry, chop and use. If you can’t find crystallized ginger, you can omit it or mix 2 tablespoons minced fresh ginger with 2 teaspoons sugar and let stand for about 10 minutes, until the ginger is syrupy.
Makes about 36 cookies
2¼ cups (306 grams) all-purpose flour
2 tablespoons unsweetened cocoa powder
1 to 2 teaspoons instant espresso, to taste (optional)
1½ teaspoons ground ginger
1 teaspoon ground cinnamon
¼ teaspoon ground cloves
½ teaspoon baking soda
½ teaspoon fine sea salt
1½ sticks (12 tablespoons; 6 ounces; 170 grams) unsalted butter, cut into chunks, at room temperature
1⁄3 cup (67 grams) sugar
1⁄3 cup (67 grams) packed light brown sugar
1 large egg yolk, at room temperature
½ cup (120 ml) unsulfured molasses
1½ teaspoons pure vanilla extract
1⁄3 cup (55 grams) chopped crystallized ginger or 2 tablespoons minced fresh ginger mixed with 2 teaspoons sugar (see headnote)
7 ounces (200 grams) semisweet or bittersweet chocolate, chopped chip-size
Sugar, for rolling
Whisk the flour, cocoa, espresso (if using), spices, baking soda and salt together. Working with a stand mixer fitted with the paddle attachment, or in a large bowl with a hand mixer, beat the butter and both sugars together on medium-low speed for about 3 minutes, scraping the bowl as needed, until fully blended. Add the yolk and beat for 1 minute, then add the molasses and vanilla, beating until smooth. Turn off the mixer, add the dry ingredients all at once and pulse the mixer until the risk of flying flour passes. Working on low speed, mix the dough until the flour is almost but not completely incorporated. Add the crystallized ginger (or the sugared fresh ginger) and chocolate and mix until the dry ingredients disappear into the dough and the ginger and chocolate are evenly distributed. If you’ve got bits of dry ingredients on the bottom of the bowl, mix them in with a flexible spatula.
Gather the dough into a ball, flatten it and wrap it in plastic. Refrigerate for at least 2 hours. Getting ready to bake: Position the racks to divide the oven into thirds and preheat it to 350 degrees F. Butter or spray regular muffin tins or, if making free-form cookies, line two baking sheets with parchment paper or silicone baking mats.
Have a medium cookie scoop at hand. Alternatively, you can use a rounded tablespoonful of dough for each cookie. If you’re using tins, find a jar or glass that fits into them and can be used to flatten the dough; cover the bottom in plastic wrap. Spoon some sugar into a wide shallow bowl.
For each cookie, mold a scoop or spoonful of dough into a ball between your palms, then turn it in the sugar to coat and put in a muffin cup or on a baking sheet, leaving 2 inches between each ball of dough. If using tins, use the jar or glass to flatten each ball until it almost reaches the sides of the cup. If it’s free- form, press to flatten to about 1⁄2 inch thick.
Bake the cookies for about 13 minutes, rotating the tins or sheets top to bottom and front to back after 7 minutes. The cookies should be lightly set around the edges and softer in the center. Transfer the tins or sheets to racks and let the cookies rest for 15 minutes before unmolding them and/or placing them on racks to cool completely.
If you’re baking in batches, make certain to start with cool tins or baking sheets.
Playing Around Ginger-Chocolate Ganache: To make a ganache that you can use to finish the cookies, bring 2⁄3 cup heavy cream and four 1⁄4-inch-thick slices of fresh ginger to a boil in a small saucepan. Turn off the heat, cover the pan and allow the cream to infuse for 20 minutes. Return the cream to the boil, then remove the ginger and pour half of the cream over 6 ounces finely chopped bittersweet chocolate. Wait for 30 seconds, stir gently and then stir in the remainder of the cream. Dip the top or one side of each cookie in the chocolate and place on a parchment-lined baking sheet. Chill for 20 minutes to set the chocolate. Bring the cookies to room temperature before serving.
Storing You can refrigerate the dough for up to 3 days. You can also scoop out the dough, shape into balls and freeze the balls on baking sheets; when they’re firm, pack them airtight and keep frozen for up to 2 months. Remove the dough from the freezer and let the balls sit at room temperature for at least 15 minutes, then roll in sugar and bake. The baked cookies can be kept in a sealed container at room temperature for up to 4 days. They’ll get a little drier and a little less chewy, but that will make them even better for dunking.
The Dorie Greenspan cookbooks on my shelf are all a little worse for wear. It’s a badge of honour on my cookbook shelf. This one will be battered and stained before long, too. There are recipes for any occasion or mood and the technical advice in the “techniques” chapter and throughout the book is invaluable (and not just for cookie-baking). And there’s one more thing that I haven’t mentioned. Dorie is a wonderful writer, with a warm and engaging voice. I spent my first few days with this book simply reading her stories in the headnotes to the recipes. I’m looking forward to working through this book.
When you pick up your copy, I encourage you to bake along with Dorie’s Cookies & Kindness campaign and if you’re really keen, to join the bakers working through the entire book over at Tuesdays with Dorie
Raincoast Books has been generous enough to offer a copy of Dorie’s Cookies to one Canadian reader. You can find the giveaway here and enter until December 22nd: Win a copy of Dorie’s Cookies*
Gift Giver’s Guide: For the cookie monster, the small bite seeker, the flavour adventurer, and the gracious gifter.
Come back next week for a review of a book that is as virtuous as it is indulgent.
*This giveaway is open to residents of Canada. You must have a Canadian mailing address. The winner will be required to answer the following skill testing question: 26 X 15 =_____ This promotion is in no way sponsored, endorsed or administered by, or associated with, Facebook. We hereby release Facebook of any liability. Winner(s) will be contacted by email within 48 hours after the giveaway ends. Entrants must provide a valid email address where they can be reached. Each of the winners must respond to the email announcing their win within 48 hours, or another winner will be chosen. No purchase of any product is required. If you have any additional questions – feel free to send us an email!
You can find links to the rest of my Holiday Cookbook Review Series giveaways here. They’re all open until December 22nd.
Like the other books in Mark Bittman’s ‘Everything’ series, the title isn’t so much literal as it is functional. There are more than 2,000 recipes, if you count the variations, but it’s not the number of recipes that makes this book so useful. It’s that the book provides a broad overview of the variety of sweet and savoury baked goods while concisely guiding you through the steps of making its recipes.
This isn’t a book for the coffee table cookbook reader – the illustrations in this book are there for reference, not for recreation. This book’s pleasures are in the absorption of its recipes and techniques and in the possibilities it opens up for your own kitchen experiments.
The categories run from breakfast to sauces, just as you’d expect, with a detour into frozen desserts, puddings, and candies, because they accompany baked sweets so well or make a lovely finish for some of the savoury baked meals Bittman includes.
His savoury chapters were, unexpectedly, my favourite when I first skimmed through the book. I expected to spend most of my time in the cookies and squares sections of the book, in preparation for holiday sweets season. Instead, I kept finding savoury recipes that complemented meals I was making, or used up leftover ingredients I had languishing in the refrigerator.
I started with a blue corn version of his Southern Corn Bread, seasoned with rosemary and paprika. I was out of yellow cornmeal, but I didn’t have any qualms about the substitution. Bittman encourages experimentation throughout the book. He hopes that at least some of the recipes will become so ingrained that you can make them from memory, freeing you to adapt them in whatever way you’d like. The variations that he provides for his recipes are delicious in their own right, but they also act as permission to follow your own inclinations. His base recipes are solid enough to withstand most of what your pantry or imagination can throw at them.
So when I was craving a biscuit-topped turkey pot pie, I turned to his buttermilk biscuit recipe, used the proportions for drop biscuits, replaced the buttermilk with yogurt, and added freshly dried sage and a few grindings of black pepper to the mix. There were some disputes over ownership of the leftovers.
Bittman’s pumpkin pie recipe is typical for the book. The base recipe is delicious and perfectly proportioned. He then goes on to provide nine variations, referencing half a dozen more recipes. You could spend a decade’s worth of holidays exploring his variations as written or use any of the recipes or components as jumping off points for your own creations.
I couldn’t resist making the caramel drizzled chipotle version in its graham cracker crust and I’m considering bringing the gingersnap and meringue version to Christmas dinner. The component references had me paging through the book, leaving tape flags as I went. I’m going to have to start having regular dinner parties if I’m going to work my way through all the desserts I marked.
I’ve been given permission to share this recipe and its variations with you. (You’ll have to buy the book if you want the recipes for the components.) I’m curious to know which variation caught your attention first and if any of them have sparked an idea for a creation of your own.
MAKES: One 9-inch pie, enough for about 8 servings TIME: About 1 hour
A foolproof fall favorite, equally good with squash purée and best served with a dollop of Whipped Cream spiced with nutmeg, cinnamon, or ginger.
1 recipe Cookie Crumb Crust (page 263) made with gingersnaps or graham crackers
3 eggs
½ cup sugar
½ teaspoon cinnamon
¼ teaspoon ginger
⅛ teaspoon nutmeg
⅛ teaspoon allspice
¼ teaspoon salt
1½ cups canned pumpkin purée
1 cup half-and-half, cream, or milk
Bake the crumb crust as described in the recipe. Start the filling while the crust is in the oven. When the crust is done, turn the oven up to 375°F and cool the crust slightly on a rack.
Use an electric mixer or a whisk to beat the eggs with the sugar, then add the spices and salt. Mix in the pumpkin purée and then the half-and-half.
Put the pie plate with the crust on a rimmed baking sheet. Pour the pumpkin mixture into the crust all the way to the top (you might have some left over). Transfer the baking sheet to the oven and bake for 45 to 55 minutes, until the mixture is firm along the edges but still a bit wobbly at the center. Cool on a rack until it no longer jiggles, then slice into wedges and serve, or refrigerate for a day or 2.
PUMPKIN PIE WITH CRUMBLE TOPPING Bake the pie with no topping for 20 minutes. Remove from the oven, top with Crumb Topping (page 265), and finish baking.
SWEET POTATO PIE A hint of orange takes this pie to new heights: Substitute puréed cooked sweet potato for the pumpkin and add 2 teaspoons grated orange zest.
PUMPKIN-TOFU PIE Use ½ recipe Vegan Piecrust (page 261) for an all-vegan dessert: Substitute 1 pound silken or other soft tofu for the eggs and half-and-half. Drain the tofu, purée it with the other ingredients, then pour into the crust and proceed with the recipe.
CANDIED GINGER PUMPKIN PIE Add a hint of sweet spice: Sprinkle ⅓ cup chopped candied ginger over the filling before baking.
PUMPKIN PRALINE PIE A pumpkin-pecan pie crowd pleaser: While the pie bakes, combine ¾ cup chopped pecans, ¼ cup packed brown sugar, a pinch of salt, and 1 tablespoon melted butter. Sprinkle over the baked pie and return to the oven for 5 to 8 minutes or until the topping is toasted and fragrant.
CHILE PUMPKIN PIE WITH CARAMEL SAUCE The subtle heat of chipotle powder gives this pie a mysterious heat. (And who doesn’t love Caramel Sauce?) Add ½ teaspoon chipotle powder with the other spices. Make a batch of Caramel Sauce (page 581) and drizzle it over the pie slices to serve.
MARBLE PUMPKIN-CHOCOLATE PIE A beautiful way to incorporate chocolate into pumpkin pie: Melt 4 ounces dark chocolate and let cool. Reserve 1 cup of the pumpkin filling and stir the chocolate into it. Pour the plain pumpkin filling into the crust (about three-quarters full) and dollop it with the chocolate filling. Using a knife or a toothpick, swirl the chocolate in large figure-eight motions. Do not overswirl or the effect will be lost. Bake as directed.
MARBLE PUMPKIN–CREAM CHEESE PIE A refreshing dose of tartness cuts through the warm spices: Make a batch of Cream Cheese Filling from the Chocolate–Cream Cheese Swirl Cake variation (page 202). Pour the pumpkin filling into the crust (about three quarters full), then swirl the cream cheese filling into the pumpkin as instructed in the Marble Pumpkin-Chocolate Pie above.
PUMPKIN MERINGUE PIE WITH GINGERSNAP CRUST A meringue topping makes this exotic: Use a Cookie Crumb Crust made with gingersnaps. Bake the pie as directed, then let cool completely (you can speed this part up in the fridge). Make meringue as described on page 279 and pile it over the top of the pie, making sure to spread it all the way to the edges of the crust. Set the pie plate on a cookie sheet and bake at 425°F for 6 to 10 minutes, until lightly browned.
Raincoast Books has been generous enough to offer a copy of How to Bake Everything to one Canadian reader. You can find the giveaway here and enter until December 22nd: Win a copy of How to Bake Everything*
As much as this book shines in its recipes and their variations, I’m just as excited about the range of reference materials included in How to Bake Everything. The basics section and chapter introductions are thorough and there are useful additional indexes across categories like vegan, gluten-free, favourite flavours, and showstopper recipes. But what’s especially welcome are the wealth of charts and infographics included in the book. From a traditional chart like his flavour combination guide to the stylish flow chart that helps you choose exactly what kind of cookie you’re in the mood to bake, these resources create paths through what could be an overwhelming volume of recipes.
Ultimately, this book could act as an apprenticeship for a beginning home baker, while providing refreshers and skills-building for experienced ones. It’s a fairly thorough survey of what’s thought of as traditional American baking that also manages to provide a range of recipes from around the world. The book is full of simple, homey recipes that deliver the techniques and confidence needed to accomplish the more complicated ones.
Many of the cookbooks on my shelves are exercises in experiencing the author’s cooking style. When I reach for any of Bittman’s ‘Everything’ books, I’m looking for references, guides, and inspirations for my own home cooking. I’ve happily added How to Bake Everything to that shelf.
Gift Giver’s Guide: For the deep diver, the reference reader, the kitchen experimenter, and the everyday cook.
Come back next week for a review of a book that will make you the toast of your holiday cookie swap.
*This giveaway is open to residents of Canada. You must have a Canadian mailing address. The winner will be required to answer the following skill testing question: 8 X 22 =_____ This promotion is in no way sponsored, endorsed or administered by, or associated with, Facebook. We hereby release Facebook of any liability. Winner(s) will be contacted by email within 48 hours after the giveaway ends. Entrants must provide a valid email address where they can be reached. Each of the winners must respond to the email announcing their win within 48 hours, or another winner will be chosen. No purchase of any product is required. If you have any additional questions – feel free to send us an email!
You can find links to the rest of my Holiday Cookbook Review Series giveaways here. They’re all open until December 22nd.
I received a review copy of Scratch from Raincoast Books. Nevertheless, all opinions in the following post are my own.
My introduction to the Rodale family came through the stack of Organic Gardening magazines beside my Dad’s favourite chair. What I learned from them has guided the way I eat and shop, and the choices I make in my backyard gardening experiments.
So, I was curious to see what Rodale Inc. CEO Maria Rodale‘s approach to food would be in her new cookbook, Scratch.
I was happy to discover that Rodale’s food philosophy is much like my own, emphasizing a variety of fresh, seasonal foods in preparations that are weeknight easy and full of flavour. On the weekends, I may take the time to learn new techniques, prepare an elaborate meal, or take on a multi-day baking project, but for the rest of the week I want food that is as simple to prepare as it is tempting to eat. What I don’t want are “15 minute meals” that rely on processed food or skimp on taste.
It’s that middle ground that Maria Rodale is passionate about sharing. Her cookbook is like a peek into her kitchen’s handwritten recipe books and card files. These are the recipes that her kids ask for, or have developed themselves. They’re recipes collected from extended family, memorable restaurant meals, travel, and house guests. They’re the recipes that add up to an everyday life that’s full of meals made from scratch.
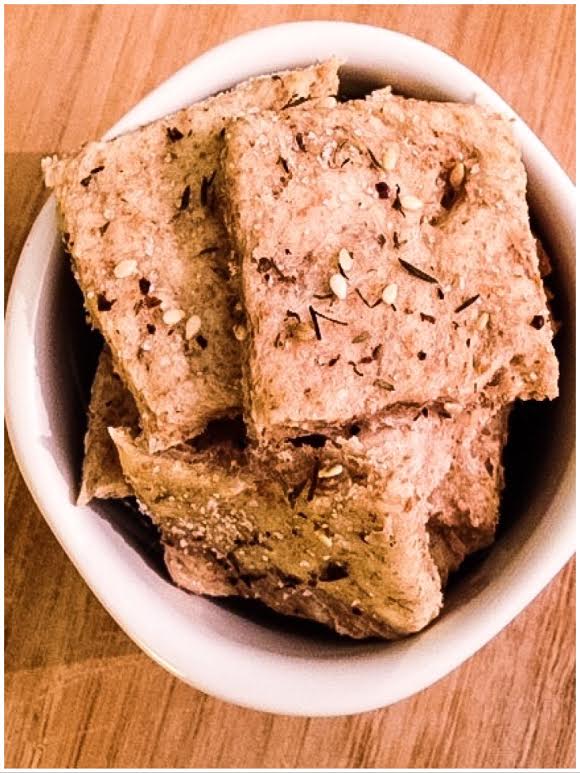
She’s pared down her recipes to the essentials, both in ingredient and technique, to make them accessible to new cooks and attractive to busy ones. From the sampling I’ve done so far, this method hasn’t sacrificed flavour or healthy ingredients. Her homemade cracker recipe is a perfect example of this – finding only complicated, time-consuming recipes online, she developed her own version that captured the taste and crunch she wanted, simply and quickly. It’s a basic recipe that’s good just as it is, or can be used as a canvas for any flavour you crave. I took one of Rodale’s variation suggestions and sprinkled za’atar on mine. They’ll be great in soup, but I’m also enjoying snacking on them right out of the tin I’ve stored them in.
Her food is rooted in her Midwestern upbringing, but it’s also firmly planted in the 21st Century. There are classic American recipes like glazed ham or chicken noodle soup, alongside recipes that make use of today’s global palette of ingredients, like Vietnamese rice paper rolls or quinoa kale, and sunflower seed salad. The salad was the first recipe I tried when the book arrived and it’s perfect for lunchboxes or a buffet side dish.
It’s also one of the recipes in the book that accommodates gluten-free and vegan/vegetarian eaters, in a book that doesn’t exclusively cater to either. That’s another aspect of this cookbook that reflects the way I cook – I’m a gluten-loving omnivore, but many of the people in my life eat differently than I do and I’ve grown accustomed to cooking for a variety of food needs. Scratch is full of recipes that easily accommodate these diets, without resort to specialty ingredients or complicated substitutions.
Another recipe that is naturally vegan and gluten-free is Rodale’s Tomato, Chickpea, and Rice Soup, which the publishers have been kind enough to allow me to share with you.
TOMATO, CHICKPEA, AND RICE SOUP
My yoga teacher, Holly, taught me how to make this soup, and it’s delicious. She based it on a Marcella Hazan recipe she found online, but of course we modified and simplified it a bit. We made it on a cold winter’s day, and it was the most heartwarming, soul-satisfying soup you can imagine. Don’t worry about the amount of oil, it gives the soup a lovely richness. Feel free to add more stock if you prefer a thinner soup.
Serves 4 to 6
½ cup extra virgin olive oil
4 cloves garlic, peeled
1 can (14 ounces) whole peeled tomatoes
Leaves from a few sprigs fresh rosemary, chopped
2 cans (14 ounces each) chickpeas, drained and rinsed
4 cups vegetable stock or chicken stock, store-bought or homemade (page 111)
Crushed red pepper flakes (optional)
Salt and freshly ground black pepper
1 cup Arborio rice
Grated Romano cheese, for serving
In a soup pot, heat the oil over medium heat. Add the whole cloves of garlic and cook, stirring, for 2 minutes, or until golden.
Carefully add the tomatoes and lightly mash them with a potato masher to break them down a little. Reduce the heat to low and simmer for 20 to 25 minutes.
Add the rosemary and chickpeas, increase the heat to medium, and cook for 1 to 2 minutes. Add 1 cup of the stock, the pepper flakes (if using), and salt and black pepper to taste. Cover and simmer for 15 minutes.
Ladle two-thirds of the soup, including the garlic, into a blender and process until smooth.*
Return the puree to the pan with the remaining 3 cups stock and bring to a boil. Add the rice, reduce the heat to medium, and simmer for 20 to 25 minutes, until the rice is cooked. Divide among bowls and pass grated Romano at the table.
* This step is totally optional, but results in a lovely thick, smooth soup.
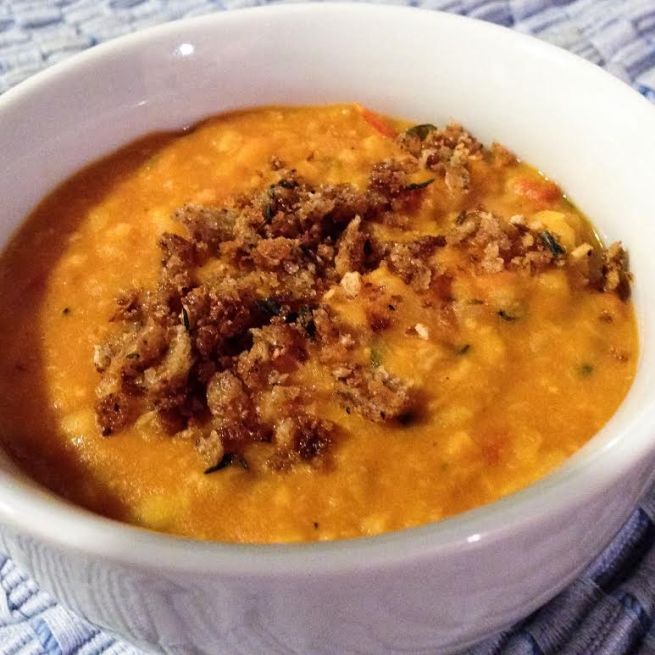
There aren’t very many ingredients in this soup, but it’s full of flavour. Simmering the tomatoes in garlic-infused olive oil brings back a bit of summer to them and partially pureeing the soup makes it as silky as though it were made with cream. I garnished mine with garlicky breadcrumbs, as I had them on hand, but it would have been just as delicious without any garnish at all. That said, it would be fantastic with the grated Romano called for in the recipe, too.
This recipe is easy enough for a beginner, but appealing to experienced cooks – so many of us would reach for short grain rice when making soup, but Arborio rice makes it so much richer and more filling. There are other recipes that are geared toward novices, like Rodale’s simple grilled cheese, but I keep dipping into this book for gems like her celery with brown butter and toasted almonds. It helped me to happily eat down my overabundance of celery this fall.
Scratch is the perfect cookbook to give to a young adult striking out on their own or even a teenager who wants to learn their way around the kitchen. But it’s also a lifesaver for busy working adults who are disenchanted with recipes that promise speed, while sacrificing quality and flavour. And for those of us who want to eat healthy whole foods, but are uninterested in the latest food fads and unafraid of a little bit of everything in moderation, this book is on point.
Rodale’s go to cookbook was the Joy of Cooking and she’s produced a contemporary book in the same spirit – one that can guide you from novice to experienced home cook, while remaining a resource for years to come.
Raincoast Books has been generous enough to offer a copy of Scratch to one Canadian reader. You can find the giveaway here and enter until December 22nd: Win a copy of Scratch*
Gift Giver’s Guide: For the weeknight chef, the family feeder, the kitchen novice, and the organic eater.
Come back next week for a review of a book that will turn you into a confident crafter of all things baked.
*This giveaway is open to residents of Canada. You must have a Canadian mailing address. The winner will be required to answer the following skill testing question: 15 X 12 =_____ This promotion is in no way sponsored, endorsed or administered by, or associated with, Facebook. We hereby release Facebook of any liability. Winner(s) will be contacted by email within 48 hours after the giveaway ends. Entrants must provide a valid email address where they can be reached. Each of the winners must respond to the email announcing their win within 48 hours, or another winner will be chosen. No purchase of any product is required. If you have any additional questions – feel free to send us an email!
You can find links to the rest of my Holiday Cookbook Review Series giveaways here. They’re all open until December 22nd.
In high summer there are few things that make me as happy as pulling fresh food out of my own garden. Well, maybe a delivery from my parents of Chilliwack corn and whatever they’ve been growing in their own garden.
When that coincides with a delivery from Maille Canada, I start feeling ecstatic.
Maille was kind enough to send me a jar of the newest edition to their range of cornichons – Gherkins with Caramelized Onions. Knowing how good their cornichons are is a liability. I found it difficult not to open the jar before I’d settled on a recipe to use them in. This would have been a very different post then, as they don’t last long around here.
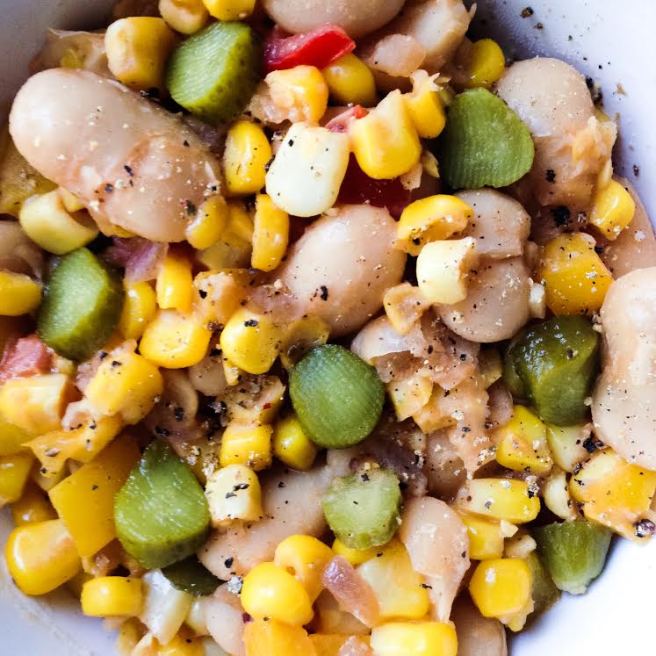
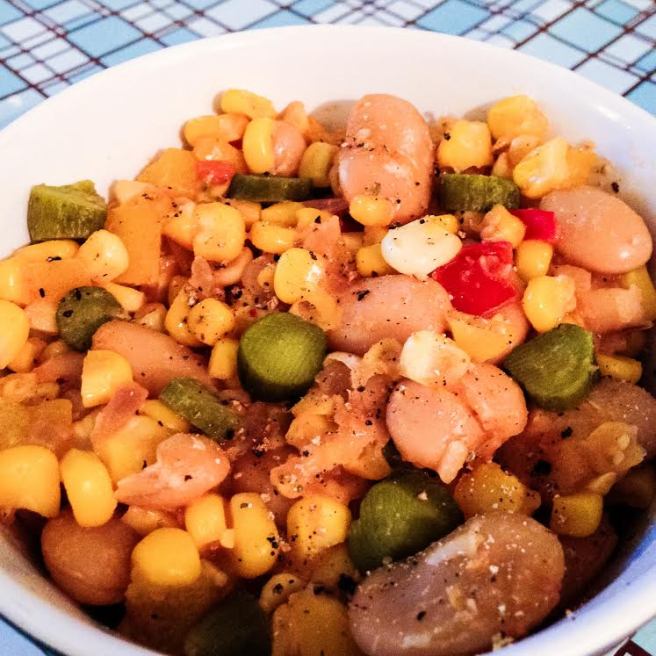
Willpower prevailed and I came up with a version of one of my favourite side dishes, succotash, to showcase the flavour of these wonderful cornichons. Succotash is one of those infinitely variable dishes that can stray very far from its original components (corn, lima beans, and tomatoes), while still retaining its character.
I’ve made a really good winter slow cooker version with edamame and frozen corn, but my favourite time to make it is right now, when the best of the summer’s corn is at its height.
I love corn on the cob – who doesn’t? But fresh corn has so much more to offer – I eat it raw in salads, cooked with the cob in soup, and sliced off the cob in almost any dish I can work it into.
As for cornichons, I’ll eat them straight out of the jar, but love to add them (and their brine) to salads, meat dishes – or again – any dish I can work them into.
These cornichons are flavoured with caramelized onions in a brine rich with grape must, wine vinegar, and mustard and coriander seeds. They’re delicately piquant and provide a perfect acid that enhances the fresh summer flavours of this succotash without overwhelming them.
In winter, I want a succotash that’s almost a stew, but in summer I like to add raw vegetables (like cherry tomatoes) to the mix. It’s much more like a warm salad and the brine works with the sauce provided by the corn, Roma tomato, and butter beans, to act like a vinaigrette.
We ate the succotash with roasted new potatoes and beets and steamed green beans – all fresh from the garden. It made for a hearty vegan meal. But, this could easily act as a barbecue side. It would be particularly great with grilled pork chops or chicken, along with a piquant potato salad
It’s also adaptable to whatever you’re bringing home from the fresh markets or pulling from your own garden. The green beans could have easily been added to the succotash, the butter beans replaced by Lima beans, Borlotti beans, or edamame. But don’t skip the cornichons or their brine. You’d regret it.
Garden Succotash with Cornichons
Makes 6-8 servings
1 Tbsp olive oil
1 small red onion, finely diced
4 cloves garlic, minced
2 sprigs fresh thyme
1/2 tsp salt
freshly ground black pepper
3-4 ears (4 cups of kernels) fresh corn
2 398 mL (14 oz) cans of butter beans
1 sweet pepper (any colour), diced
1 Roma tomato, coarsely diced
12 cherry tomatoes, diced
6 Maille Cornichons (Gherkins) with Caramelized Onions, sliced thinly
1 Tbsp brine, from the jar of cornichons
Cut the kernels from the cob using a chef’s knife, while standing the corn cob in a large bowl. Slowly slide the knife under the kernels, keeping as close to the cob as you can (and keeping your fingers well out of the way). Discard the cobs and set aside.
Heat the olive oil over medium heat in a large skillet or pan. Add the onion, with a pinch of the salt, cooking until translucent and beginning to brown, about 10 minutes. Add the garlic and cook a minute or two more, until soft.
Turn the heat to medium-low. Add the corn kernels, butter beans, sweet pepper, Roma tomato, and thyme sprigs, with the salt and a generous grinding of fresh black pepper. Stir well. Cook until the corn is barely tender and all ingredients are heated through, about 7-10 minutes.
Remove the thyme sprigs. Add the cherry tomatoes and cornichons, with a tablespoon of brine from the jar. (Make sure you get some of the caramelized onions along with the brine.) Mix well and serve immediately.
I will be tracking down these cornichons as soon as this jar is empty. They’re a staple in my cooking and on my snack table, too. They’ve taken their place alongside the Maille’s mustards that fill almost an entire shelf on the door of my refrigerator.
But, you don’t have to live vicariously through me – these cornichons are in wide release across Canada. And if you live in Metro Vancouver, you’ll also soon have an opportunity to sample some of Maille’s more exclusive offerings, in person. Maille is going to be bringing their Flavour Studio to New Westminster’s Columbia StrEAT Food Truck Fest on August 20th. They will be holding culinary workshops and mixing custom gourmet mustards. Their exclusive fresh mustard will be on tap and headmaster mustard sommelier Harry Lalousis will be there to demonstrate ways to embellish your cooking with Maille’s mustards.
I’ll be there and I’ll be writing about the day shortly afterward, so if you don’t join me, you’ll have to settle for experiencing it all vicariously. I know what my choice would be.
I received a jar of Maille’s Gherkins with Caramelized Onions from Maille Canada, but received no other consideration. All opinions are my own.
Mustard does something magical to lamb. Slather it on a leg of lamb before roasting and it forms a beautiful crust. Add some to a shepherd’s pie and it will marry the flavours of all the seasonings. Dollop a tablespoonful into a meatball mixture and it will add tenderness along with flavour. I enjoy the pairing so much that I sometimes forget that there are other flavours that can complement lamb. I suppose it’s not surprising that when Maille Canada kindly sent me a sample of their famous Honey Dijon mustard, I started making plans for the ground lamb in my freezer.
Maille’s Honey Dijon is already a favourite of mine, but their squeeze bottle packaging was new to me. It’s meant for outdoor eating, so I wanted to make something that would showcase the flavour of the mustard, but would also translate easily to the barbecue.
Our weather has been a little spotty of late, so I roasted these meatballs in the oven. But, they will roast just as beautifully in a grill pan on the barbecue. I make my meatballs with rice, which means I don’t have to exclude gluten-free eaters. You could easily replace the rice with another grain or quinoa. I cooked the rice in a tomato-rich vegetable broth, but you could use chicken broth, lamb broth, or plain water, instead.
These meatballs get their tenderness from the mustard and a bit of yogurt, with a tiny bit of extra piquancy from some finely diced cornichon (a trick I picked up from Dorie Greenspan). They’re great on their own, or with a bit of tomato sauce. They’re lovely in soup and I suspect they’d elevate a meatball sandwich, especially if you served them on a baguette with cultured butter and a generous slathering of honey Dijon.
Honey Dijon Lamb Meatballs
Makes 15-20 meatballs
1 lb ground lamb
1/2 cup cooked basmati rice
1 egg
1 tbsp plain French-style yogurt
1 tbsp Maille Honey Dijon Mustard
1/4 cup chopped fresh flat-leaf parsley
1 cornichon, finely diced
1/4 cup diced onion
2 cloves garlic, minced
1 tsp fresh rosemary (or 1/2 tsp dried)
zest of 1/4 lemon, grated
1/2 tsp salt
a good grinding of black pepper
Preheat oven to 400°F. Line a rimmed baking sheet with parchment paper. Or, use a grill pan and cook on the barbecue with the lid closed.
In a large bowl, gently but thoroughly mix all ingredients. Shape into balls of 2-3 tablespoons of the mixture and place on lined baking sheet.
Bake for about 25 minutes, until nicely browned and cooked through. (If you’re using a meat thermometer, cook to 160°F.)
Serve immediately. Leftovers can be gently reheated in broth or tomato sauce, or added to soup. Or, place them on a tray and freeze them, then transfer to an airtight container or freezer bag. They’ll keep for 3-6 months.
Maille sent me two squeeze bottles of their Honey Dijon mustard. I’ve been working my way through one of the bottles, using it for sandwiches, salad dressings, and marinades. And now that summer’s about to begin in earnest, I’m glad to have a container of gourmet mustard that’s picnic-safe. The other bottle was sent home with my mother. My parents grill all summer long and they were eager to add it to their condiment arsenal.
I think this packaging is going to be a hit. People are seeking out higher quality sausages and cured meats for their al fresco meals these days. It makes sense that they’d want to elevate their condiment selection, too. Maille is certainly confident that’s the case – beginning this month, you’ll be able to find their honey Dijon in supermarkets, as well as gourmet stores. Barbecue culture is growing up.
I received two bottles of Maille’s Honey Dijon Mustard from Maille Canada, but received no other consideration. All opinions are my own.
Today, I have something of guest post from Kevin, reviewing one of the products he was especially eager to try, Simply Delish Soup and Salad:
On Saturday April 2nd, I went with Teresa to the Fraser Valley Food Show. As someone who has been celiac since my birth in 1971, and who has been vegan for almost a year and a half, I was a bit skeptical about finding much that I would like at the show. I say this even knowing full well how much things have changed for people with celiac disease since the 70s and for vegans in the last five years.
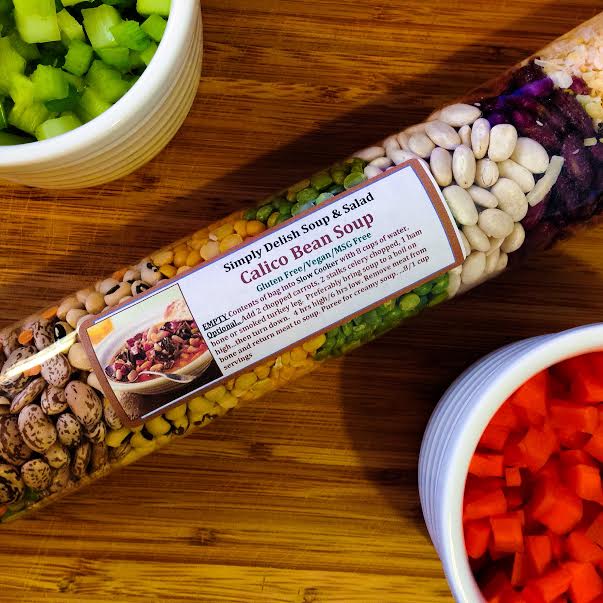
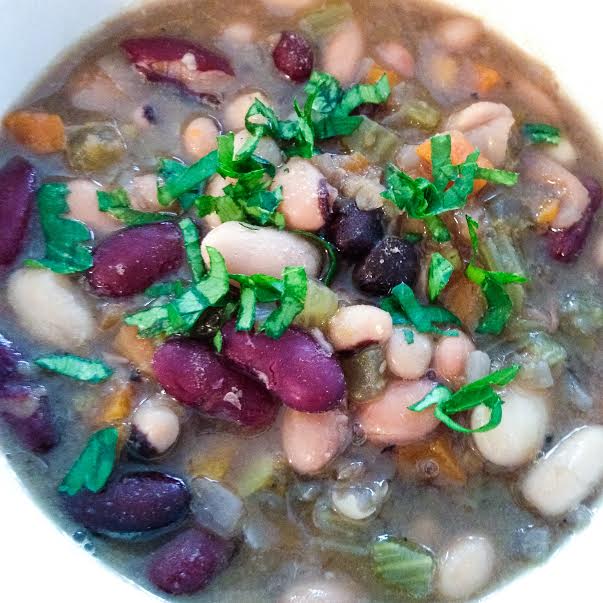
The place that immediately caught my eye was Simply Delish Soup and Salad. Their display booth was outstanding. I couldn’t stop looking at their pre-packaged soups, as they looked incredibly pretty. I believe everything but one item was both gluten-free and vegan. The service was friendly but not overbearing. Brad was very helpful in explaining their product and I thought it was cool he was aware of Teresa’s One Wet Foot blog. I ended up leaving with their Calico Soup.
I initially thought that $9.00 was a lot to pay for this pretty package of beans and spices. Once I realized how much soup it makes, I realized I was wrong – it makes a lot of soup for $9.00. Teresa even helped me do some quick math about how much it would cost otherwise. Usually one pays a lot extra for convenience, but not here. The soup couldn’t have been easier to make – just put it into a slow cooker and add water. As someone who likes convenience with vegan/gluten-free cooking, I can’t even begin to explain how much I loved the simplicity of this.
Often with pre-packaged vegan and gluten-free food, not only is it over-priced but it’s also loaded with unhealthy ingredients. This soup couldn’t be farther from that – the nutrient value is extremely high in this soup. I can’t recommend this soup enough. I was happy to hear that Brad & Chelsey sell their product in Vancouver, as we plan on having much more of it in this household.
I agree with Kevin’s assessment – we enjoyed a delicious soup with minimal effort – we threw in some diced celery and carrot, as we had it on hand, but I suspect it would have been just as enjoyable without. I also added some salt just before serving. Brad and Chelsey don’t add any salt to their products, which I appreciate for two reasons – salt makes dried pulses tough and I like to control the amount of salt in our food. We like just enough salt in our food to enhance the flavours.
There’s a place for soup mixes like this in our lives – made with healthy ingredients, guaranteed gluten-free and vegan, great as is while easy to customize, and perfect for days when hands on cooking isn’t feasible. They’re a great addition to our pantry.
We received no consideration for our review of this product. It’s part of an occasional series of posts highlighting locally made products that we buy and enjoy.